Reducing Time Spent for an XCTest
The XC test was only divided into unit tests and integration tests until recently, and I found out that unit tests can also be divided into application tests and library tests according to how they operate runtime. I summarized the differences and the usage of the two.
Application Test vs Library Test
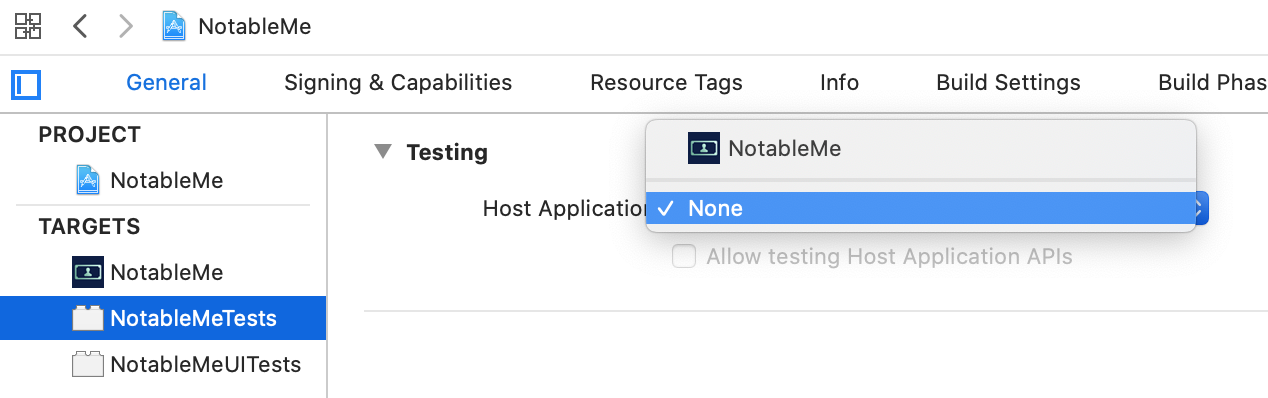
If you select the app executable from the Host Application item from the unit test target, it becomes an application test, and if you select None, it becomes a library test. If you did not change the initial settings when creating a unit test target, the Host Application will be selected as default. So until now, I made most of the tests as application tests without giving them much thought. But if you use them according to each purpose there is a clear advantage.
Application Test
A unit test that tests parts related to the iOS app(UIViewController, UIWindow, UIView, etc) should be included in the application test bundle. The application test bundle requires a host app to run the test, as well as an iOS simulator that would install the host app.
The disadvantages of an Application test are as follows.
- There is an app lifecycle, and a timing issue might occur, given different test results.
- Since the simulator can only run one host app, the application target cannot be tested using parallel testing on one simulator.
Library Test
A library test is used to test logic unrelated to the app. Library tests do not require the host apps to be installed on the simulator, so they are less affected by simulators with unstable behavior.
However, there are some iOS APIs that do not work in library tests. In that case, it should be checked in the application tests.
- UIControl’s func sendActions(for controlEvents: UIControl.Event), which is used to imitate the button taps of a user in a unit test does not work.
- You cannot make a random UIWindow into a keyWindow. There is no UIWindow because there is no host app. Therefore, snapshot testing which tests after rendering a UIView is impossible.
- Keychain-related API
(and there could be more.)
Why It’s Good to Use the Library Test
Because the Application test is injected into the host app process, the test code only begins to spin after the app is installed and launched within the simulator. On the other hand, the library test is not dependent on the app, so it runs on xctest executable($DEVELOPER_DIR/Platforms/iPhoneSimulator.platform/Developer/Library/Xcode/Agents/xctest) within the iOS simulator without installing the app, or within the xctest commandline process(/usr/bin/xctest/). Therefore, switching the application test to a library test can reduce the time spent in testing by the number of targets switched * time spent for installing and running the app. Also, testing can be done in parallel since it doesn’t have to wait for the host app.
How to Switch to a Library Test
First, go to the General tab of the test target, change the Host Application to None and then try running the test.
If a problem occurs, solve it as follows.
1. 테스트 번들이 실행되지 않을 때
아래와 같은 런타임 에러를 낸다.
Library not loaded.
(중략)
Reason: image not found
Application test는 호스트 앱에 주입이 되기 때문에 앱 타겟에 링크된 라이브러리를 사용할 수 있다. 하지만 library test는 독립적인 프로세스에서 실행이 되기 때문에 테스트 타겟에 외부 의존성을 직접 링크해줘야한다. 코코아팟을 사용하고 있다면 Podfile을 열어 앱이 사용하고 있는 외부 의존성을 테스트 타겟에도 추가해준다.
2. 테스트 케이스가 실패할 때
실행은 되지만 테스트케이스가 실패한다면 iOS 앱에 의존성 있는 API를 사용했을 확률이 크다. 따라서 타겟을 분리하고 library test에서 실패하는 테스트는 application test로 옮긴다. 즉 iOS 앱이 필요한 테스트만 application test에서 실행하고 나머지는 library test로 실행하면 테스트 소요시간을 줄일 수 있다
1. When the test bundle isn’t running
It makes a runtime error as seen below.
Library not loaded.
(...)
Reason: image not found
Because application tests are injected into the host app, they can use libraries that are linked to the app target. But because library tests run on an independent process, we need to directly link an external dependency on the test target. If you’re using CocoaPods, open Podfile and add the external dependency that the app is using into the test target as well.
2. When the test case fails
If the test runs but the test case fails, it’s highly likely that a dependent API is used on the iOS app. Therefore, the target is separated and the test that fails in the library test is moved to the application test. In other words, running tests that need iOS apps in the application test and running the rest as library test can reduce time spent in testing.
이 글의 초안을 읽어준 류성두 님에게 고마움을 전합니다.
Tags: xctest, application test, library test, ios testing
재택근무 한달
한국의 코로나바이러스 전파 상황이 악화될 무렵 싱가폴에 들어온 바람에 입사하자마자 의무로 2주간 재택 근무를 해야했고 현지 상황을 고려해 현재는 자발적으로 재택 근무를 하고 있다. 그 사이 스프린트를 하나 끝마쳤다. 새로운 나라에서 새로운 팀에 합류하자마자 원격 근무를 하게 돼서 어려운 상황이 될 수 있었지만 나름 성공적으로 새 회사에 적응하고 업무를 익힐 수 있었다. 화상회의 덕분이다.
코로나 때문에 시작된 강제 재택근무
Grab 입사 첫날에 반나절 정도 오리엔테이션을 받고 집에 돌아갔다. 다음날 아침에 출근 준비를 하는데 HR에서 연락이 왔다. ‘혹시 싱가폴 들어오기 전에 어느 나라에서 왔냐.’ ‘미국에 쭉 있다가 한국에서 하룻밤 자고 들어왔다.’ ‘알았다, 잠깐만 기다려라.’
(10분 뒤)
‘방금 회의에서 정해진 내용인데 한국에서 입국한 직원들은 사무실 출근하지 말고 2주 동안 재택근무하기로 했다. 오늘부터 절대 사무실 오지 마라.’
아니, 나 아직 매니저 얼굴도 못봤고 팀원들도 못만나봤는데 2주나 재택근무를 하라고? 인사는 고사하고 업무를 제대로 할수나 있을지 걱정이 됐다. 원격으로 제대로 근무를 해본 적이 없었기 때문에 의사소통이 제대로 될지도 의구심이 들었고 아직 회사 업무 방식이나 코드도 잘 모르는데 원격으로 답답하게 어떻게 헤쳐나가야하나 싶었다.
모든 미팅은 줌Zoom으로 동시 진행된다
첫 주는 사실상 팀이 프로젝트를 시작하기도 전이라 공식 업무가 없었다. 개발에 필요한 거 설치하고 코드 실행해보고 RIBs 튜토리얼 보고 ‘그랩버디’한테 이것저것 물어보면서 보냈다. 그리고 다음주 월요일이 되어 정식으로 킥오프를 했다. 미팅은 줌으로 진행돼서 나도 집에서 참석할 수 있었다. 이어진 스프린트 계획 미팅도 줌으로 참여했다. 그런데 나만 원격으로 미팅에 참여한건 아니었다. 사무실에 있는 사람들은 한 회의실에 모여 컴퓨터 한 대를 대표로 연결하고, 출장 가있거나 재택 근무를 하는 사람들은 각자 위치에서 접속했다. 이렇게 본격적인 화상회의는 처음이었는데 은근히 매끄럽게 진행돼서 놀랐다. 미팅을 주도하는 사람이 화면 공유 기능으로 자신의 컴퓨터 화면을 공유하고 이걸 다같이 보면서 돌아가며 발언을 했다.
Grab은 줌이 사내 시스템과 연동이 되어있어서 회의 일정을 잡으면 회의실만 예약되는게 아니라 줌 링크도 자동으로 생성이 되어 참석자들에게 공유된다. 그리고 모든 회의실에는 마이크가 설치돼있고 회의를 시작할때는 항상 줌 미팅을 연결한다. 심지어 15분짜리 데일리 스탠드업도 무조건 줌 미팅을 생성한다. 평균적으로 2 ~ 3명 정도는 원격으로 참석하는 느낌이다. 어느날은 매니저가 느즈막히 출근하면서 오는 길에 폰으로 줌에 접속해서 데일리 스탠드업에 참여하기도 했다.
원격 근무를 가능하게 해주는 일상화된 화상회의
모든 회의를 화상으로 병행하니 회사에 안가도 필요한 회의에 참석할 수 있어서 업무에 지장이 없었다. 코드 구조나 사내 개발 프로세스, 툴 사용하는 방법 등도 동료가 줌으로 친절히 설명해주었다. 화상회의가 생활화되니 다른 나라 오피스에서 일하는 동료들과 협업하는 것도 어색하지 않다. 다같이 비대면 회의에 익숙해지니 가능한 것 같다. 무엇보다, 언제든 개인의 필요에 따라 원격 근무를 할 수 있는 여건이 마련되어 있는 것이 좋다. 그래서 사람들은 3 ~ 4주 자리를 비우면서 모국으로 휴가를 가고 그 곳에서 일주일 이상 원격 근무를 하기도 한다.
강제 재택근무 기간이 끝나고 이틀 출근했었는데 다음날 회사 직원이 코로나 확진을 받아서 그 이후로는 팀이 자발적 재택 근무까지 하고 있는 중이다. 화상회의가 일상화되어 있으니 팀 전체가 재택 근무를 하더라도 큰 불편없이 평소처럼 일할 수 있는 것 같다.
#줌_주식사러_갑니다
Tags: work from home, zoom
괜찮은 Swift 면접 질문
면접 중에 받았던 Swift 관련 질문 중 괜찮다고 생각했던 것들을 모아봤습니다. 난이도 순으로 정렬했습니다.
- class와 struct의 차이
- class A와 class B에 동일한 함수가 있다면 어떻게 바꿀 수 있나?
- enum / function / closure 각각 value type 인가 reference type 인가?
- Array, Dictionary, Set 등등의 컬렉션 타입은 value type 인가 reference type 인가?
- 컬렉션 타입에는 수 십만, 수 백만 개의 element가 들어있을수 있는데 스위프트는 이를 어떻게 최적화 하는가?
- Optional은 스위프트에서 어떻게 구현되어 있는가?
- inter-object communication에 사용하는 디자인 패턴을 아는대로 말해보아라. (최소 3개)
- heap과 stack의 차이는 무엇인가? (heap과 stack에 저장되는 스위프트 데이터의 다른점이 무엇인가? 나누는 기준이 무엇인가?)
-
위에 질문 팔로업 (스포 포함)
value type이 heap에 저장되는 경우는 언제인가? - retain cycle은 언제 / 어떻게 발생하는가?
- ARC에서 retain count는 무엇인가? compile time 기능인가 runtime 기능인가?
class B: A일 때 A와 B 둘다func one()이라는 함수가 있으면 B 인스턴스나 A 인스턴스에서 이 함수를 호출했을때 둘 중 어떤 함수를 호출할지 어떻게 판단하는가?
Tags: ios, tech interview
iOS 개발자 싱가폴 이직기
싱가폴에 있는 Grab이라는 동남아 스타트업에 합류하게 되었습니다. 해외 이직을 준비했던 과정을 남깁니다.
지원하기
처음부터 적극적인 구직 활동을 한 것은 아니었다. 이전 팀은 급작스럽게 해체되어 어수선했고 새 팀 문화에는 적응이 쉽지 않던 기간을 거쳐 결국엔 자리를 잡고 좋은 동료들과 재밌게 개발하며 성장하고 있었다. 다만 언젠가는 해외에서 살고 싶은 생각이 있었고, 막연하게나마 1 ~ 2년 내에 나가는 것을 목표로 삼았다. 어느날 “Hello from GRAB” 이라는 제목의 이메일을 받았다. Grab의 리쿠르터가 보낸 메일이었다. 싱가폴 본사에서 iOS 개발자를 뽑고 있는데 이력서를 보내줄 수 있냐는 메일이었다. 리쿠르터가 첨부해준 회사 소개 자료와 개발 블로그 등을 보고 나서 꽤 좋은 인상을 가지게 되었다. 몇 일 뒤에는 친구가 운영하는 뉴스 채널에서 Grab 관련 기사를 재밌게 읽었다. 하지만 이력서를 보낸 뒤에는 더이상 소식이 없어 서서히 잊혀졌다.
그러던 어느날 페이스북을 돌아다니다가 해외에 계신 한국 개발자님이 모바일 개발자 팀원을 구하고 있다는 포스팅을 보았고 그 회사가 Grab이었다. 단순 노출 효과 때문이었을까. 별다른 고민이나 뜸을 들이지 않고 바로 그 분께 메시지를 보냈고, 일면식은 없었지만 흔쾌히 내부 추천으로 지원서를 접수해주셨다. 그랬더니 바로 그 다음날 담당 리쿠르터로부터 메일을 받았고 면접 날짜를 잡았다.
최초에 “Hello from GRAB”이라는 제목으로 콜드메일을 보낸 리쿠르터는 아마도 링크드인을 통해서 내 프로필을 봤을 것이다. 그 메일 덕분에 Grab이라는 회사를 알게 되었다. 만약에 미리 Grab에 대해 몰랐다면 페이스북 포스팅을 그냥 지나쳤을지도 모른다. 그리고 나에게 먼저 연락을 한 리쿠르터를 통해 이력서를 냈음에도 답장이 안왔지만, 내부 추천을 받으니 하루 만에 면접이 잡혔다. 링크드인과 내부 추천(“레퍼럴”). 이 두 개가 지원 단계에서 가장 중요한 역할을 했던 것 같다.
p.s. 최종 합격한 후에야 콜드메일을 보냈던 리쿠르터한테서 면접 볼 수 있냐고 답장이 왔다.
기술 면접
본격적인 기술 면접 전에 HR 담당자와 30분 정도의 폰스크리닝이 있는 것이 일반적이지만, 아마 내부 추천이라서 그 단계는 건너뛴 것 같다.
기술 면접은 자료구조와 알고리즘 1시간, iOS 관련 면접 1시간 각각 다른 면접관이랑 진행됐다. 자료구조와 알고리즘 면접은 단답형 질문으로 시작했다. 기억에 남는 질문은 없지만 무난했다. 그리고 나서 라이브 코딩을 했다. 링크드 리스트를 만드는 문제였다. 면접관이 알려준 사이트에 접속해서 코딩하는 것이었는데, 자동완성이 없었기 때문에 구글 닥스에 코딩하는 것과 같은 느낌이었다. insert, append, pop, remove 등등 링크드 리스트에 필요한 인터페이스를 만들었다. 한번에 매끄럽게 만들진 못했다. 생각하느라 멈추기도 하고, 면접관이 엣지 케이스를 지적해주면 고치기도 했다. 어찌저찌 완성하고 나서 그 다음 문제는 이 링크드 리스트를 가지고 소팅을 구현하라는 것이었다. 배열로 소팅하는 법은 알았지만 링크드 리스트로 소팅하는 것은 생소했다. 앞이 캄캄했지만 조금씩 해결해봐야 했다. 먼저 소팅 알고리즘을 선택해야 했다. 알고리즘을 잘못 선택하면 많은 시간을 허비할 것 같아서 신중하게 고민했다. 배열이 가지고 있는 random access 속성에 의존이 심한 소팅은 쓸 수 없을거라 판단했고 그래서 머지 소트를 구현하겠다고 말했다. 그리고 약 한시간 동안 열심히 했지만 결국 면접이 끝날때까지 제대로 돌아가는 알고리즘을 완성하지 못했다. 다만 끝까지 포기하지 않았고 계속해서 힌트를 얻어내려고 했다. 그래서였는지 면접관도 면접 시간을 15분 정도 초과하면서까지 도와주었다.
바로 이어서 두번째 면접은 iOS 관련 면접이었는데, 사실상 스위프트 면접이었다. 특히 reference type, value type을 구분하고 비교하는 문제가 많았고, 메모리 관련 어려운 질문도 있었다. 대답을 바로 한 질문도 있고, 힌트를 받고 나서 답과 근접하게 간 것도 있고, 아예 몰랐던 부분은 그냥 모른다고 했다. 몰라도 괜찮다고(?) 한 것도 있었다. 단답형 질문이 끝나고 나서 라이브코딩을 했다. 자체 NotificationCenter를 만드는 것이었다. addObserver, removeObserver, post 해주는 로직을 구현했다. 인상 깊었던 것은 단번에 완벽한 구조로 만들기보다 일단 최대한 간단하게 만들어놓고 조금씩 개선해나가는 방식으로 풀도록 유도했다는 점이었다. 예를 들어 처음에는 옵저버를 하나만 등록할 수 있게, 그 다음에는 여러 개를 등록할 수 있게, 그 다음에는 remove도 할 수 있게 만드는 식으로 발전시켜 나갔다. 왠지 모르게 익숙했는데 나중에서야 내가 회사 프로젝트에서 이런 클래스를 이미 만든 적이 있었다는걸 깨달았다.
두 명의 면접관 모두 친절했고 도움을 많이 줬다. 질문도 매우 좋아서 언젠가 내가 면접관이 되면 물어봐야겠다 싶었던 것들도 많았다. 기술적인 내공도 많아 보였고 면접 스킬도 좋은 사람들이어서 회사에 대해 좋은 인상을 가지게 됐다.
매니저 면접
기술 면접을 통과하면 최종 매니저 면접이다. 매니저 면접은 기술 평가 및 culture fit 평가를 하고 팀 소개를 들을 수 있다. 면접 질문은 과거 경험부터 기술적인 질문부터 매우 다양했다.
- 지금 개발하고 있는 앱에서 어떤 역할을 하고 있는가, 어떤 부분을 개발하고 있나
- 좋은 매니저는 어떤 사람이라고 생각하는가
- 최근에 핫픽스를 냈던 경험이 있는가
- 코드 리뷰는 어떻게 하는가
- 가장 해결하기 어려웠던 문제는 뭐였나
- 버그나 이슈가 들어오면 어떻게 해결하는가
- MVVM(혹은 다른 디자인 패턴)에 대해 알고 있는가
- 초과 근무에 대해 어떻게 생각하는가 (아마도 초과근무가 잦은 팀이어서 물어봤나보다ㅋ)
- (코드 snippet을 보여주고) 이 클래스에 대한 테스트 코드를 어떻게 작성할지 말로 설명해봐라
등등 광범위한 질문을 받았다. 그런데 알고보니 사내 SDK를 만드는 팀이었고, 입사한다면 내가 팀 내 유일한 iOS 개발자가 되는 것이었다. 그래서 면접 후에 리쿠르터에게 메일을 보냈다. 이 팀도 좋은 기회가 될 것 같고 매니저도 좋은 사람 같지만 나는 앱 개발을 선호하기 때문에 다른 팀으로 배정받을 수 있을지 물어봤다. 그래서 새로운 매니저와 다시 면접을 봤다. 두번째 매니저 면접을 본 다음날 합격 메일을 받고 오퍼를 기다렸다. 그런데 이때부터 회사 전체가 채용이 동결되었고, 결국 해당 팀은 TO가 풀리지 않아 또 다른 팀의 매니저한테 연락을 받아 무려 세 번째 최종 면접을 보고 드디어 오퍼를 받게 되었다.
가장 기억에 남는 경험은 두번째 매니저 면접 때 였다. 내 블로그를 봤다면서, 한글로 쓰여있어서 이해할 순 없었지만 그 중 하나가 SOLID 원칙에 대해 얘기하고 있는 것 같았는데 이 자리에서 SOLID 원칙에 대해 설명해달라고 했다. 아는 대로 열심히 설명을 했다. 설명을 다 들은 매니저는 각 원칙을 따르는 구조나 위배하는 예시를 iOS 프레임워크와 연결지어 설명을 하는 것은 처음 들어봤다면서 놀라워했다. 내 블로그 글은 멘토님이 사내 게시판에 올리신 글을 읽고 내가 이해한대로 재정리한 내용이었다. (멘토님 글 보러가기)
매니저 면접을 세번이나 보게 해서 어이도 없고 은근히 피말렸지만, 입사하면 나의 매니저가 될 사람을 미리 만나보고 오래 얘기를 해볼 수 있다는 점에서는 좋았던 것 같다. 팀의 분위기나 업무 방식에 대해 충분히 질문할 수 있었고 어떤 리더인지 어렴풋한 느낌을 받을 수 있었다. 그런데 지난주에 입사하고 보니 팀이 또 바뀌었다. 회사가 격동의 시기를 겪고 있어서 그런지 조직 변동도 잦은거 같다.
레퍼런스 체크
최종 면접을 통과하고 나면 레퍼런스 체크를 한다. 특정 웹서비스를 통해서 하게 되는데 가장 먼저 ‘셀프 평가’를 한다. 나의 업무 스타일에 대해 인성 평가 스타일의 문항 수십 개를 여섯 가지 척도로 체크 한다. 그러고 나의 레퍼런스가 되어줄 사람들의 인적 사항을 입력하면 그 사람들에게도 이메일로 비슷한 설문지가 간다. 객관식과 서술형이 섞여 있다. 안내사항에 따르면 무조건 다 뛰어나고 잘한다고 응답하는 것보다는 내가 제출한 응답과 얼마나 비슷하고 일관성 있는지를 본다고 한다.
보상 체계
해외 기업의 보상 체계는 국내 기업과 다르다. 인센티브는 성과 평가에 따라 연봉의 퍼센트로 정해지고, 입사시 1회성으로 지급되는 사인온 보너스가 있다. 기본급은 면접 결과에 따라 결정되는 개발자 역할 레벨이 기준이 된다. 레벨은 회사마다 다른데 유명한 미국 IT 회사의 레벨은 levels.fyi라는 사이트에서 볼 수 있다. Grab은 이 사이트에는 없지만 블라인드에서 레벨과 연봉에 대한 정보를 띄엄띄엄 찾을 수 있었다. 그리고 RSU라는 회사 주식을 보통 4년 동안 나눠서 받게 된다. 스톡 옵션은 행사 가격으로 내 돈을 주고 주식을 사는 개념이라면 RSU는 바로 주식을 받는 것이다. 그래서 스톡 옵션이나 RSU를 받으면 회사가 성장할수록 연봉이 오르는 효과가 생긴다. 다만 Grab처럼 비상장 회사의 RSU는 유동성이 매우 낮고, 심지어 현금 가치가 없어질 수도 있다는걸 감안해야 한다. 검색해본 바로는 레벨이 올라갈수록 RSU를 몇 배로 많이 받게 되는 구조인 것 같다. 그리고 Grab은 1회성 이주 비용도 지급한다.
기술 면접 팁
기술 면접에서 중요한 것은 면접관이랑 끊임없이 대화하는 것 같다. 구글의 코딩 인터뷰 가이드를 보면 계속 자신의 생각을 말로 내뱉으라고 한다. 혼자 머리 속에서 끙끙대지 말고, 내가 뭘 하려고 하는지 면접관에게 말하고 피드백을 받아야 한다. 그래서 나도 면접에서 질문을 받으면 항상 아래 3가지를 꼭 말하면서 풀어갔다. (단답형 질문일때 말고)
(1) 내가 문제를 어떻게 이해했는지, 이해한 바가 맞는지, 특정 경우에는 어떻게 해야하는지 등등 조금이라도 애매한 부분이 있으면 꼭 확인했다. 애매하지 않아도 괜히 한번 더 물어봤다. 면접관한테서 최대한 말을 끌어내면 문제에 대한 힌트를 얻어낼 확률이 높아진다.
(2) 이해한 바를 토대로 어떻게 문제를 풀 것인지 대략적인 설명하고 왜 그렇게 생각했는지. 이 부분이 정말 중요한 것 같다. 틀린 접근법으로 시간을 허비하느니 미리 면접관의 반응을 살피는 것이다. 가만히 있거나 끄덕이면 그대로 했고, 만약 잘못된 방법이라면 면접관이 개입했다.
(3) 고민을 하다가 막힐 때에는 나의 의도가 뭔지, 그래서 이러이러한걸 해봤는데 왜 안되고 있는지 등등을 말했다. 이 부분은 약간 혼잣말에 가깝다. 이런 말을 할때는 딱히 면접관의 응답을 바라지도 않는다. 그리고 별 응답이 없는 경우도 있었다. 하지만 혼잣말로라도 내 진행 상황을 말하면 내 생각도 정리가 잘됐고, 또 면접관도 끼어들 타이밍을 잡을 수 있다.
면접에서 최악의 상황은 침묵이 15분 이상 지속되는 것이라고 생각한다. 링크드 리스트로 머지 소트를 짤 때 한동안 너무 진척이 없자 계속 침묵할 수 없다고 생각해서 ‘나 배열로는 머지 소트 짤 줄 아는데 그거라도 해보면 안되냐’고 했고 그러라고 했다. 그리고 나서 다시 원래 문제로 돌아오니 면접관이 내가 짠 코드를 가지고 또 힌트를 줘서 조금이라도 만회할 수 있었던 것 같다.
싱가폴 회사 vs 국내 회사 면접 #키워드
Grab 한 곳만 면접을 본 것은 아니었다. 우연히 비슷한 기간에 링크드인과 원티드로 국내 기업 면접 제안이 와서 수락했고, 싱가폴 소재 회사에도 추가적으로 지원했다. 이 중 하나는 최근 우아한형제들을 인수한 딜리버리히어로의 자회사 푸드판다였다. 결과적으로 국내 스타트업 세 군데, 싱가폴 스타트업 세 군데랑 면접을 봤는데, 싱가폴과 국내 기업의 면접 방식과 질문의 방향성에서 차이가 느껴졌다. 우선 비기술적인 질문의 차이부터 보면 싱가폴 기업(폰스크리닝을 하지 않은 Grab을 제외하고)은 HR 담당자와의 첫 폰스크리닝 때 희망 연봉이나 현재 연봉을 물어봤다. 이직이 처음이다 보니 갑자기 훅 들어와서 당황하기도 했지만 준비해놓은 답안으로 잘 회피했다. 한편 국내 기업은 세 군데 모두 면접 중에 “왜 이직하려고 하는지”, “왜 지금 팀을 떠나려고 하는지”를 의외로 집요하게 물어봤다. 적당히 대답하여 넘겼지만 이직하려는 의도가 있다는걸 내가 설득해야하는 듯한 분위기여서 현재 회사나 상황에 대한 불만을 말해야할 것 같은 압박이 있었고, 면접을 보는 나의 진정성을 의심받는 것 같아서 마음이 불편했다. (심지어 회사가 먼저 면접을 제안한 상황이었음에도..)
기술 면접에서도 다른 점이 있었다. 국내는 iOS 지식과 경험을 묻는 질문이 주를 이뤘다. UIKit, Rx, 스토리보드 활용, 어떤 오픈소스를 써봤는지 등등. 반면 싱가폴 회사들은 테스트 코드 작성, 의존성 주입, 디버깅 방식 등에 대해 물어봤다. 다들 1 ~ 2주 마다 앱을 정기적으로 배포하는 프로세스를 추구하고 있으며 이를 달성하기 위해서 테스트 커버리지 확보와 빌드/배포 시간 단축이 중요한 임무인 것처럼 느껴졌다. 총평을 하자면 국내는 iOS 앱 개발을 얼만큼 해봤는지에 초점이 있었고 싱가폴은 아키텍처, 테스트 코드 작성에 얼만큼의 경험이 있는지를 궁금해하는 것 같았다. 그 외 알고리즘 라이브 코딩, 행동 질문(behavioral)과 과거 사례를 물어보는 경험 질문은 비슷했다.
🇰🇷: #이직사유 #iOS개발
🇸🇬: #희망연봉 #자동화 #의존성주입 #테스트
번외 1) 국내 한 곳과 싱가폴 한 곳에서는 개발 과제를 주기도 했다. 3일 ~ 7일 정도 주고 회사가 제공해주는 API 몇 개를 사용해서 간단한 앱을 만드는 것이었는데 정말 재밌었다. 프레임워크로 모듈화도 하고 유닛/UI 테스트도 만들어보고, 평소에 해보고 싶었던 것들 이것저것 시도해 볼 수 있는 기회로 삼았다. 그 후 면접관들과 과제에 대해서 얘기해보는 시간은 면접이라기보다 팀원들과 회고하는 느낌이 들어서 매우 좋았다. 그 중 하나는 채용 프로세스 종료 후에 좀 더 정리하고 보완해서 깃헙에 올려 다른 개발자들의 피드백도 받아봤다.
번외 2) 기억에 남는 질문 하나는 내가 회사에서 개발하는 앱의 앱스토어 별점을 아느냐는 것이었다. 웹툰의 별점은 4.6이라고 하니 놀라면서 자기네 앱은 2점대라서 이걸 올리기 위해 노력을 하고 있다고 했다ㅎㅎ. 개발자가 자신이 개발하는 앱의 퀄리티와 유저들의 반응에 관심을 가지고 있는지 알아볼 수 있는 참신한 질문이라고 생각이 들었다.
Tags: ios developer, moving to, Singapore