Making a uber/RIBs Unit Test
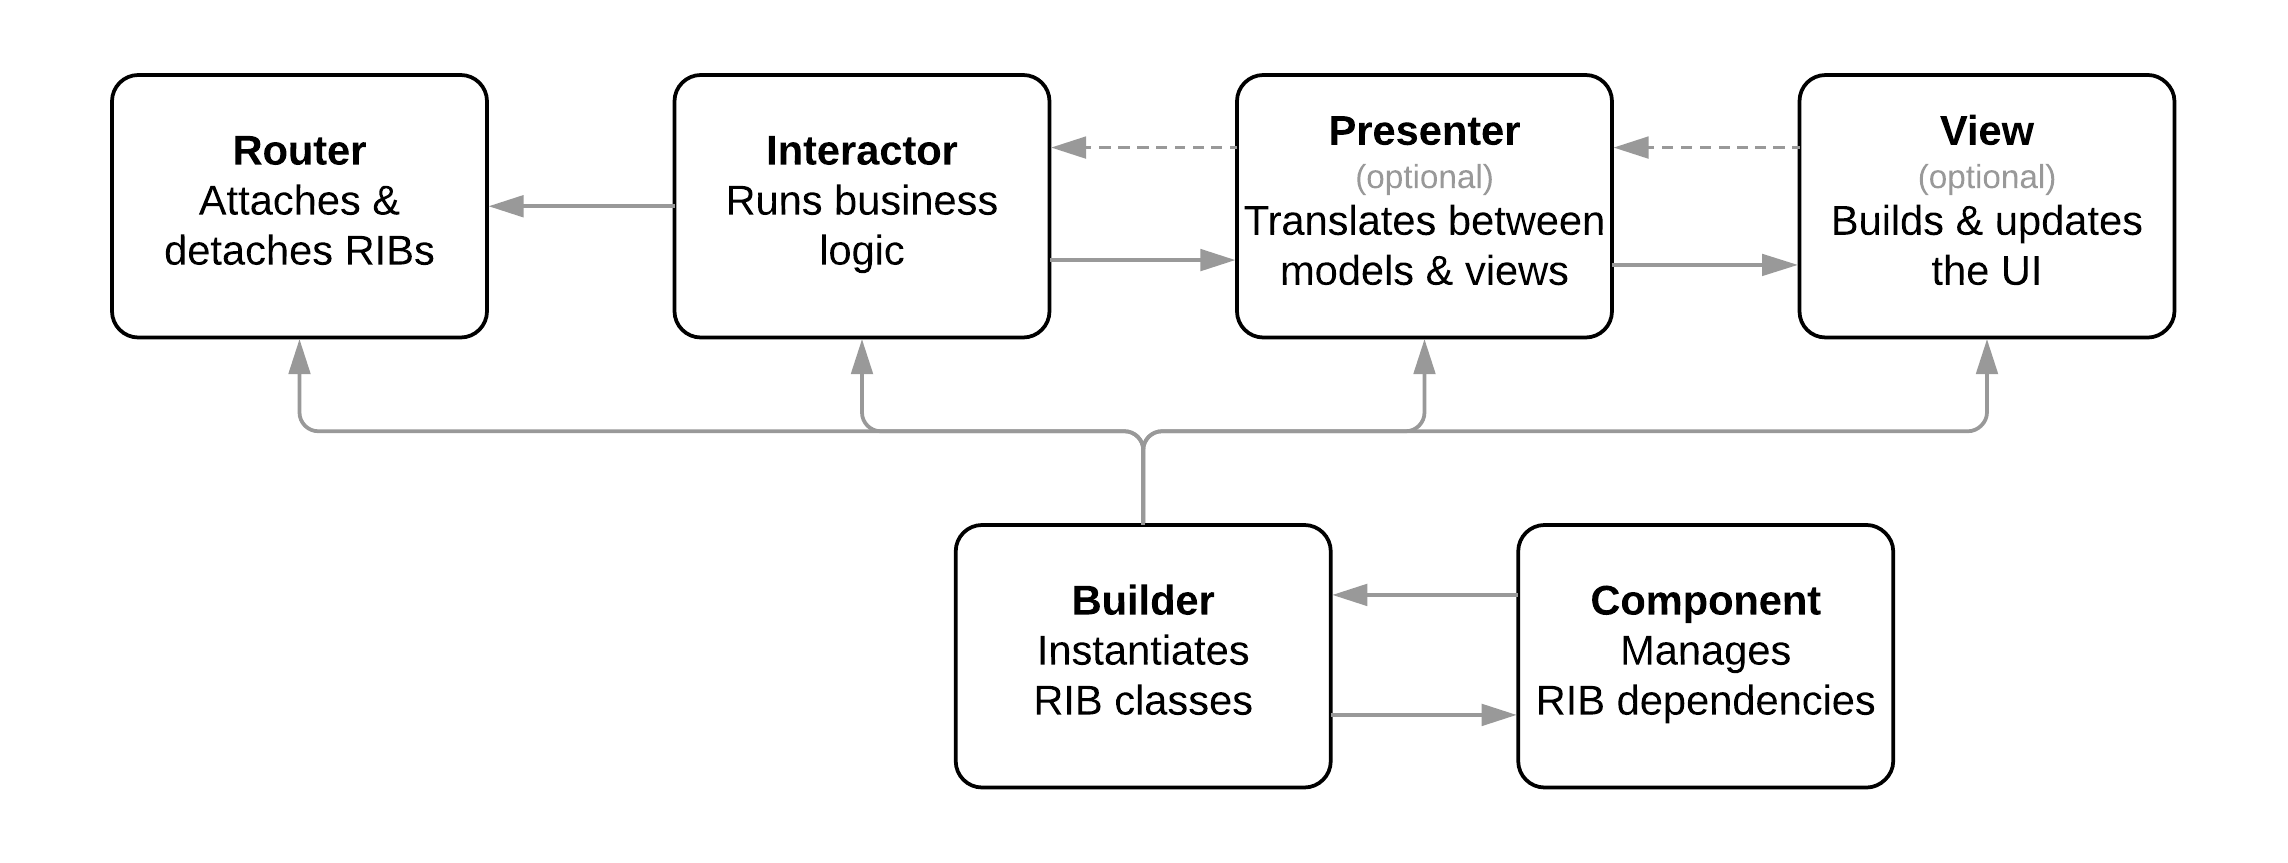
RIBs is a mobile architecture framework released as an open source developed by Uber. RIBs framework separates the complex app status management and business logic into RIBs chunks(referred to as Riblets) and links them in a tree structure. The object which composes one unit riblet, and the role of each are as follows.
RIBs and Object Oriented Programming
Just like the above diagram each RIBs object has a distinctly separate role. (single responsibility) And the input and output of each object as indicated by an arrow are abstracted with a protocol(dependency inversion), so they can be separated and independently tested using the mocking method. Also, the parent and child riblets are decoupled into a tree structure, so they can be a child riblet that can be newly created or modified as it minimizes code modification of the parent riblets. (Open-closed Principle) What I felt after working on the project for about 2 months is that if you use the RIBs structure, the three principles, SRP, OCP, and DIP, which take up a large part in SOLID are semi-forced to keep. Of course, they’re easy to break as well. No matter what architecture you use, it depends on how the developer writes the codes, and just introducing an architecture doesn’t improve my codes.
What should be tested
The objects that make up the RIBS architecture are very easy to unit test. The roles are clear and finely divided, and since the parent and child riblets are loosely coupled, high coverage can be achieved. At least 4+ test classes are needed for each riblet, and if you use Xcode’s code generation template, it automatically generates unit test classes as well as boilerplate codes that are cumbersome to make every time. When I was first working on the project, I was lost because I did not know what to fill in for these many test classes. But as I received code reviews and looked through the previous codes, I found a rule and learned how to test according to the roles and purpose of each class.
Router Test: Child Riblet Routing
A Router’s test needs to check the action where the child riblet is attached(attachChild) and detached(detachChild) according to business logic. If you look at the Router object description, there’s an annotation that says ‘when a router creates a child router, a helper builder must be used.’(link). This means when generating a child Riblet, you shouldn’t directly use the xxBuilder class, but abstract it using xxBuildable and get it injected. This way we can check if the router generated the child riblet properly by injecting xxBuildableMock in a test environment. The Router’s role is to do routing instead according to the interactor’s request, it’s desirable that there’s no other logic than this.
Interactor Test: Various Business Logics
The Interactor is in charge of an app’s business logic, so it’s more complicated compared to other classes and gives more freedom to developers. Although it’s not easy to categorize as other components, there are a few that are being used often.
An Interactor uses the reactive programming method in order to deliver information to the child interactor(Reference: official document). If you use the reactive stream, the parent and child interactor won’t have to engage in direct coupling. It depends on the developer how to implement the stream, but it’s usually good to use RxSwift. RIBs architecture also uses Rx, so if you use this, you don’t necessarily have to add several reactive libraries. You can check if the interactor is exporting a value properly by mocking the stream in a testing environment. On the other hand, if you have to subscribe to the stream injected by the parent interactor to process tasks, inject a mock stream and check whether it processes well according to the data as you change the values in the test case.
-
The interactor receives a user input from view. To check if an appropriate task has been executed according to the user input, directly call the method in the interactor related to the view listener from the test case and check the mocked dependency object to see if the necessary task has been executed.
-
The Interactor calls the router and the presenter(or view) frequently. The view can be attached and detached, and the UI may get updated. So check whether the router and the presenter method are called according to the intent. In this case, rather than simply checking if it got called or not, it’s better to check exactly how many times it was called. You can check how many UI updates are being done unnecessarily, and also check if the view routing is not done in duplication. (Reference: Official tutorial Mock Object)
Builder Test: Generating and Injecting a Concrete Class
The Builder generates a RIBs object to connect the reference points, and creates the concrete classes necessary for dependency injection. Therefore, check the action by using is or as? to see if a correct class type has been generated.
Presenter Test: View Model Generation Logic
Check if the data model has been converted into a view model. It’s recommended that the data model does not use the UIKit class, and keep the UIKit, Core Graphics type, etc. necessary for configuring a view within the view model.
For example, a data model has a color value as a hex string and the presenter converts it to UIColor. Also, the data model has the date in Date type, and the presenter converts the value into a string using the DateFormatter and saves it into the view model. The conversion logic like this need to be checked.
View Test: Rendering Views
For views, it’s difficult to do meaningful testing only with codes. If you use a snapshot test library, the view is rendered and saved as an image file. You can check the view class(UIView, UIViewController) by rendering the view again and comparing it with the existing image file during testing. If the view changes due to modification in codes, the test case fails, and you can find out that the view is wrong in advance. Since the snapshot test is also a unit test, it gets included in the coverage. By adding snapshot tests, the coverage of the riblet could be increased by approximately 12-15%.
Tags: uber/ribs, unit tests
XCTest 소요시간 단축하기
얼마전까지 XCTest를 유닛 테스트와 통합 테스트로만 구분하고 있었는데, 유닛 테스트 또한 런타임 작동 방식에 따라 application test와 library test로 나눌 수 있다는걸 알게 됐다. 둘의 차이점과 쓰임새를 정리했다.
Application Test vs Library Test
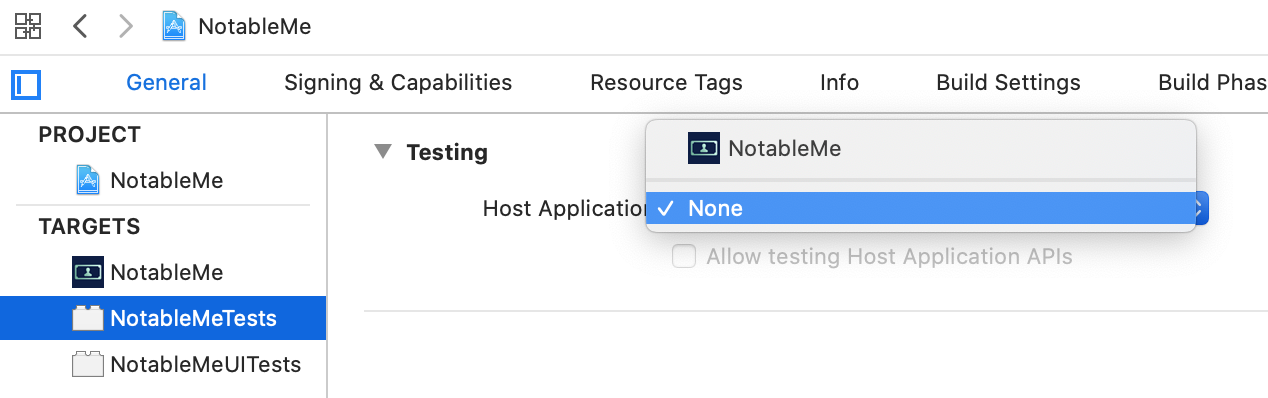
유닛 테스트 타켓의 Host Application 항목에서 앱 executable을 선택하면 application test가 되고 None을 선택하면 library test가 된다. Xcode에서 유닛 테스트 타겟을 만들 때 초기 설정을 변경하지 않았다면 기본값으로 Host Application이 선택된다. 그래서 지금까지는 별 생각없이 대부분의 테스트를 application test로 짜고 있었다. 그러나 목적에 따라 이 둘을 구분해서 사용하면 분명한 이점이 있다.
Application Test
iOS 앱과 관련된 부분(UIViewController, UIWindow, UIView 등)을 검사하는 유닛 테스트는 application test 번들에 포함시켜야 한다. Application test 번들은 테스트를 실행하기 위한 호스트 앱이 필요하고, 호스트 앱을 설치할 iOS 시뮬레이터도 필요하다.
Application test의 단점은 아래와 같다.
- 앱 라이프사이클이 돌게 되는데 이때 타이밍 이슈가 발생해 테스트 결과가 달라질 수 있다.
- 시뮬레이터는 동시에 하나의 호스트 앱만 실행할 수 있기 때문에 application test 타겟은 하나의 시뮬레이터에서 병렬(parallel) 테스팅이 작동하지 않는다.
Library Test
Library test는 앱과 상관없는 로직을 테스트하기 위해 사용한다. Library test는 호스트 앱을 시뮬레이터에 설치할 필요가 없어서 테스트가 더 빠르고 이따금씩 동작이 불안정한 시뮬레이터의 영향을 덜 받는다.
반면 library test에서는 작동하지 않는 iOS API가 좀 있다. 그런 경우에는 application test에서 검사해야 한다.
- 유닛 테스트에서 유저의 버튼 탭을 흉내내기 위해 사용하는
UIControl의func sendActions(for controlEvents: UIControl.Event)는 동작하지 않는다. - 임의의 UIWindow를 keyWindow로 만들 수 없다. 호스트 앱도 없기 때문에 UIWindow 자체가 없다. 그래서 UIView를 렌더링한 다음 검사하는 snapshot test가 불가능하다.
- Keychain 관련 API
(등등 더 있을수 있다.)
Library Test를 쓰면 좋은 이유
Application test는 호스트 앱의 프로세스에 주입되기 때문에 시뮬레이터에 앱이 설치되고 실행(app launch)까지 된 후에야 테스트 코드가 돌기 시작한다. 반면에 library test는 앱에 의존하지 않아서 앱 설치 없이 iOS 시뮬레이터 내 xctest executable($DEVELOPER_DIR/Platforms/iPhoneSimulator.platform/Developer/Library/Xcode/Agents/xctest)이나 macOS의 xctest 커맨드라인의 프로세스(/usr/bin/xctest/)에서 실행된다. 따라서 application test를 library test로 전환하면 전환한 타겟 갯수 * 앱 설치 및 실행 소요시간 만큼의 테스트 시간을 줄일 수 있다. 또한 호스트 앱을 기다릴 필요 없어 병렬로 빠르게 테스팅 할 수 있다.
Library Test로 전환하는 방법
먼저 테스트 타겟의 General 탭에 가서 Host Application을 None으로 변경하고 테스트를 실행해본다. 문제가 발생하면 다음과 같이 해결한다.
1. 테스트 번들이 실행되지 않을 때
아래와 같은 런타임 에러를 낸다.
Library not loaded.
(중략)
Reason: image not found
Application test는 호스트 앱에 주입이 되기 때문에 앱 타겟에 링크된 라이브러리를 사용할 수 있다. 하지만 library test는 독립적인 프로세스에서 실행이 되기 때문에 테스트 타겟에 외부 의존성을 직접 링크해줘야한다. 코코아팟을 사용하고 있다면 Podfile을 열어 앱이 사용하고 있는 외부 의존성을 테스트 타겟에도 추가해준다.
2. 테스트 케이스가 실패할 때
실행은 되지만 테스트케이스가 실패한다면 iOS 앱에 의존성 있는 API를 사용했을 확률이 크다. 따라서 타겟을 분리하고 library test에서 실패하는 테스트는 application test로 옮긴다. 즉 iOS 앱이 필요한 테스트만 application test에서 실행하고 나머지는 library test로 실행하면 테스트 소요시간을 줄일 수 있다
이 글의 초안을 읽어준 류성두 님에게 고마움을 전합니다.
Tags: xctest, application test, library test, ios testing