Swift Asynchronous Programming and Error Handling Using Google/Promises
Background
I happened to find out about google/promises around January or February this year. I saw the introduction and a few lines of the sample code, and thought, ‘I need to try using it’. What kind of framework is well-introduced in GitHub, so I won’t explain it in much detail here, but if I summarize it in one line, I can say it can solve the nested closures problem caused by the iOs’s characteristics of processing the results of the asynchronous tasks using a completion handler. On top of that, the error handling becomes clean as a bonus.
The reason why I thought I should use Promises as soon I found out about it was because I thought this library would help me achieve the things that I wanted to try with my codes before.
- Chaining of functions without side effects
- Error handling that is meaningful to the user
- Minimal tuning(dependency)
I thought these small goals would help me reach the final goal of creating code that’s easy to read and giving the users a better experience.
Chaining functions w/o side effects
After the announcement at the 2016 D2 iOS Open Seminar, I got to know the leader of the team that developed Papago and Whale Browser and worked with that team for a short term. The most memorable thing I learned from my mentor and the thing I’m still working to practice every day while coding is that a function shouldn’t exceed 10 lines. It may sound provocative, but in essence, I understood it as a rule that a function needs to be designed to carry out only one task.
If you try to write it in less than 10 lines, the function continues to break down into smaller features and it gives you more time to think about designing relationships between each object. Furthermore, chaining functions without side effects has the advantage that code is easily read and modified. This especially shines when used with Swift’s methods such as map, flatMap, compactMap, filter, etc.
In Promises, functions can be chained with then, always, validate, etc.
Example:
extension CNContact {
  var mainPhoneNumber: String? {
    return phoneNumbers.map { $0.value.stringValue }
                        .filter(prefixValidater)
                        .map(replaceKoreanCountryCode)
                        .map(removeNonNumerics)
                        .filter { $0.isPhoneNumber && $0.count == 11}
                        .first
  }

  private func prefixValidater(_ target: String) -> Bool { ... }
  private func replaceKoreanCountryCode(_ digits: String) -> String { ... }
  private func removeNonNumerics(_ digits: String) -> String { ... }
}
Conveying meaningful error messages to users
After several years of developing mobile apps, I had a thirst for how to handle errors well.
The step that happens most frequently in a mobile app is user interaction 👉 a series of tasks to process the request
👉 displaying the results on the screen. As a series of tasks are being processed, various errors may occur. The data may be corrupted, the network may be unstable, the server may be down, or you may have no permission to access it. In this case, rather than simply showing a meaningless message that says, “Request Failure,” letting the user know the cause of failure is much better in terms of user experience. You can make use of localizedDescription of NSError, or Error or LocalizedError protocol on Swift. In Promises, you can uniformly receive errors that occurred during several consecutive asynchronous operations in the final stage, and there’s even an opportunity to recover them.
Are you going to show an error message like this?

Or are you going to show a message that is actually helpful to the user?

Minimizing dependencies
There’s a subtle repulsion to using some ~Kits that go around the standard library. I’m the person who goes around with no protection film on my iPhone, so I’m very reluctant to add a 10-size library just for a 1-size feature, and other things on CocoaPods just to use them in one or two projects.
I’m using auto layouts without a separate library, and I was once interested in Rx so I used to study it, but eventually neglected it because it seemed like over-customizing. As they say, the end of customizing is original. Because I prefer the original, I think Promises goes ahead in performance because it wraps GCDs lighter than other similar libraries, and learning it costs less as well.
Adopting Promises to Your Project
Because you’re introducing Promises, you don’t have to redo the whole project. It’s good to apply it step by step in practical work. Usually, there is a class in charge of each characteristic of a task. (e.g. login manager, image downloader class, etc.) It’s enough to apply it only in one or two of these classes first. If you use the wrap, you don’t have to change the existing codes and create an asynchronous function in a Promise style with only a few lines of code.
A function that originally received a completion handler as a parameter:
func data(from url: URL, completion: @escaping (Data?, Error?) -> Void)
An asynchronous function that was modified to return a Promise object:
func data(from url: URL) -> Promise<Data>
Then create a Promise object and return it within the function, and carry out additional tasks with the resulting values that are/will be fulfilled.
let url = ...
data(from: url).then { data in
  //additional task using data
}.catch { error in
  //error handling
}
Additional uses are clearly and concisely explained in the document.
Use Cases
I’ve organized some use cases and precautions that I’ve learned through trial and error while using Promises.
Partial Application 기법
I’d like to introduce how to apply the partial application technique to increase the readability of the Promises pipeline and function reusability. There’s a high probability that you have tried using it if you were using higher-order functions such as map, forEach, etc.
The task of acquiring the access token after logging in to the API server is an indispensable task
in log-in based services. The virtual login steps are as follows. Sign up 👉 Log in 👉 acquire an access token. But if you’re already registered, you’ll fail to sign up. There is a chance to recover from the failure in Promises by using recover. So if the cause of failure to sign in is a duplicate user, attempt to log in.
Promises Code:
typealias MyAccessToken = String

func retrieveAccessToken(with naverToken: String) -> Promise<MyAccessToken> {
  return requestSignUp(with: naverToken)
         .then(signIn(with: naverToken))
         .recover(onError(with: naverToken))
}

//Async Server API calls
func requestSignUp(with naverToken: String) -> Promise<SignUpResponse> { ... }
func requestSignIn(with naverToken: String) -> Promise<MyAccessToken> { ... }

//partially applied functions
func signIn(with naverToken: String) -> (SignUpResponse) -> Promise<MyAccessToken> {
  return { _ in requestSignIn(with: naverToken) }
}

func onError(with naverToken:String) -> (Error) -> Promise<MyAccessToken> {
  return { error in
    switch error {
    case SignUpError.duplicateUser:
      return requestSignIn(with: naverToken)
    default:
      return Promise(error)
    }
  }
}
signIn(with:) and onError(with:) are partially applied functions that are designed to receive the SignUpResponse and Error parameters later. When chaining this way, I did not use the closure right away and used a partial application to reuse the existing API-related functions and at the same time, made the asynchronous task pipeline much easier to read.
The task that is impossible with simple chaining is await.
Await is useful when it needs to be used with combined results from several asynchronous tasks.
For example, suppose there’s a task that requires the UIImage and its major UIColor to be extracted and drawn on the screen using the URL for the thumbnail image. In short, convert the URL to UIImage 👉 extract UIColor from the UIImage 👉 create a thumbnail using UIImage and UIColor on the screen. This task was difficult to implement with then chaining alone, and it was resolved with await. This method can be used when you want to use an asynchronous task like a synchronous code.
Promises Code:
typealias ThumbnailData = (image: UIImage, color: UIColor)

func thumbnailData(from url: URL) -> Promise<ThumbnailData> {
  return Promise<ThumbnailData>(on: queue) { //queue는 백그라운드 DispatchQueue
    let image = try await(image(from: url))
    let color = try await(dominantColor(from: image))

    return (image: image, color: color)
  }
}

//Async functions
func image(from url: URL) -> Promise<UIImage> { ... }
func dominantColor(from image: UIImage) -> Promise<UIColor> { ... }
Applied Code:
let cell: MyTableViewCell = ...
let myDatum = data[indexPath.row]
let url: URL = myDatum.imageURL

thumbnailData(from: url).then { result in
  cell.imageView.image = result.image
  cell.dominantColorView.backgroundColor = result.color
}
Additionally, something important to note before using Promises,
Wrap Up
I recommend you to try this if you’ve had any regrets with asynchronous programming done in a completion handler method or if you’ve ever thought that Rx is way too vast for you while working in iOS development. I think Google/Promises is a good framework that makes asynchronous code flexible with minimal code modifications, increases readability, and is able to try many things with a small learning cost.
Tags: swift, promises, async programming, error handling
Bool 변수 이름 제대로 짓기 위한 최소한의 영어 문법
Background
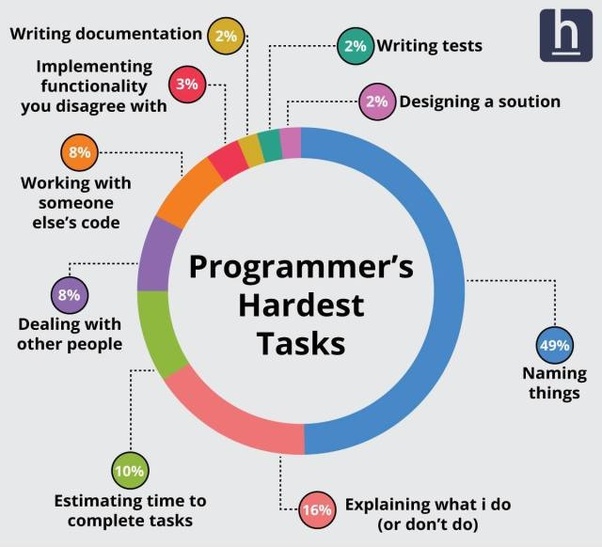
프로그래머의 가장 어려운 업무가 이름 짓기라는 설문 결과도 있듯이 변수에 적절한 이름을 지어주는 것은 어렵고 오래걸리는 일이다.
영어가 모국어가 아닌 사람들에게는 더 어려울 수 밖에 없는데 특히 Bool 변수명을 올바르게 지으려면 몇가지 영문법을 숙지해야한다. Bool 변수명은 사소한 차이로도 의미가 많이 바뀌어 코드를 읽는 사람을 더 헷갈리게 할 수도 있기 때문에 조금이라도 더 명확하고 문법적으로 맞는 Bool 변수명을 짓는 것이 중요하다는 생각이다.
Cases
Cocoa Touch의 여러 클래스들을 훑어보면서 Bool 변수 작명을 위해 알아야하는 영문법을 네 가지 케이스들로 정리해봤다.
- is 용법
- 조동사 용법
- has 용법
- 동사원형 용법
is 용법
is로 시작하는 변수명이 가장 흔한 케이스 아닌가 싶다. 뒤에 나오는 단어의 특징에 따라 세 가지로 나눌 수 있다.
- is + 명사
- is + 현재진행형(~ing)
- is + 형용사
is + 명사
“(무엇)인가?” 라는 뜻으로 쓰인다.
func isDescendant(of view: UIView) -> Bool //UIView: "view의 자식인가?"
is + 현재진행형(~ing)
“~하는 중인가?” 라는 뜻이 필요할 때 쓰면 된다.
var isExecuting: Bool { get } //Operation: "오퍼레이션의 작업이 현재 실행 중인가?"
var isPending: Bool { get } //MSMessage: "메시지가 보내지기 전 대기 중인가?"
is + 형용사
이제부터 살짝 헷갈릴 수 있다.
형용사도 두 종류로 나뉜다.
- 단어 자체가 형용사인 것 - opaque, readable, visible 등
- 과거분사 형태 - hidden, selected, highlighted, completed 등
과거분사(past participle)는 간단히 말해 동사로 만든 형용사라고 생각하면 된다. 동사를 과거분사로 바꾸면 뜻이 여러가지로 바뀔 수 있는데, 일단 여기서는 수동태라고 생각하면 되겠다. hide(숨다) - hidden(숨겨진), select(선택하다) - selected(선택된), complete(완료하다) - completed(완료된) 등등. (보다시피 동사 뒤에 -ed가 붙는 형태가 가장 흔하지만, 내가 쓰려는 동사의 과거분사를 모르겠으면 사전을 찾아보자.)
UIKit을 쓰다보면 정말 많이 보는 UIView의 프로퍼티들이 이런 경우다.
var isOpaque: Bool { get set }
var isSelected: Bool { get set }
var isHighlighted: Bool { get set }
var isHidden: Bool { get set }
❗주의❗is로 시작하는 변수명을 짓다가 범하는 흔한 실수가 바로 is + 동사원형 을 쓰는 것이다.
isAuthorize, isHide, isFind 등등.
가령,
var isEdit: Bool //gg
edit이라는 단어가 명사로 쓰일수도 있어서 해석의 여지는 있지만 뜻이 명확하지 않아 일반적으로는 곧바로 해석하기 쉽지 않다. 😧 더 잘 할 수 있다.
아래와 같이 적절하게 바꿔주면 해석이 더 쉽고 빠르다.
var isEditable: Bool //편집할 수 있는가?
var isEditing: Bool //편집 중인가?
var canEdit: Bool //편집할 수 있는가? -> 다음 '조동사 용법' 섹션 참고
4월 11일 추가
닷넷 프레임워크에 DataRowView.IsEdit이라는 불리언 변수가 있다는 제보를 받았다. 문서를 보면 ‘row가 edit mode인지’를 나타내는 불리언인데 닷넷 개발자가 아닌 다른 개발자가 edit mode 라는 것을 모르는 상태에서 문서를 읽어보지 않고는 한번에 이해할 수 없었을 것이다. 하지만 만약 IsEdit이 닷넷 프레임워크에서 자주 쓰이는 변수명이자, edit이 edit mode를 의미한다는 것이 컨벤션이라면 괜찮을 수 있다. 변수명에 신경쓰는 이유 자체가 다른 개발자(또는 내일의 나)가 내 코드를 쉽고 빠르게 이해하게 하려는 것이기에.
조동사 용법
조동사(modal verb)는 동사를 돕는 동사란 뜻인데 can, should, will 등이 있다. 주의할 점은 조동사 + 동사원형 으로 써야한다는 것 하나 뿐이다.
can: “~ 할 수 있는가?”
should, will: “~ 해야 하는가?” 혹은 “~ 할 것인가?”
등등.
var canBecomeFirstResponder: Bool { get } //UIResponder: first responder가 될 수 있는가?
var shouldRefreshRefetchedObjects: Bool { get set } //NSFetchRequest: 가져온 값을 refresh 할 것인가?
has 용법
has로 시작하는 Bool 변수명은 상대적으로 빈도가 낮지만 뜻이 전혀 다르게 쓰이는 두 가지가 있어서 알아두면 유용하다.
- has + 명사
- has + 과거분사
has + 명사
has 다음 명사가 나오면 “~를 가지고 있는가?” 라는 뜻이다. has는 have의 3인칭 단수인데 3인칭 단수에 대해서는 다음 파트에서 자세히 다룬다.
var hasiCloudAccount: Bool { get } //CKUserIdentity: 관련된 iCloud 계정을 가지고 있는가?
var hasVideo: Bool { get set } //CXCallUpdate: 콜에 비디오가 포함되어 있는가?
has + 과거분사
모든 케이스를 통틀어 가장 덜 쓰이는 케이스 같으므로 만약 이해 안되더라도 넘어가도 지장 없다. 게다가 is + 과거분사와 뜻이 거의 같기 때문에 꼭 알아야할 필요도 없어보인다.
이때의 과거분사는 아까 is + 과거분사 때와는 다른 의미이다. has + 과거분사는 현재완료 의 의미를 가지는데 굳이 해석하자면 ‘과거에 완료된 것이 현재까지 유지되고 있다’는 뜻이다. 따라서 Bool 변수로 쓰이면 ‘~가 유지되고 있는가?’ 라고 해석할 수 있다.
var hasConnected: Bool { get } //CXCall: 콜이 연결되어 있는가?
var hasEnded: Bool { get } //CXCall: 콜이 끝났는가?
근데 isConnected, isEnded로 해도 의미가 비슷하다. 영어로 미묘한 느낌적인 차이가 있긴 하지만 수능을 다시 볼게 아니라면 꼭 알아야하는 건 아니라고 생각한다.
동사원형 용법
Bool 변수 짓기의 끝판왕이라는 생각에 마지막에 넣었다. 이거까지 잘 쓸 줄 알면 원어민 개발자 부러워하지 않아도 된다. (지극히 개인적인 의견)
주의할 점은 동사원형을 3인칭 단수로 써야한다는 것이다. 3인칭 단수는 보통 동사원형 뒤에 -s나 -es가 붙는 형태이다. Cocoa Touch에서 자주 쓰이는 단어들을 보면,
- supports: ~을 지원하는가?
- includes: ~을 포함하는가?
- shows: ~을 보여줄 것인가?
- allows: ~을 허용할 것인가?
- accepts: ~을 받아 주는가?
- contains: ~을 포함하고 있는가?
등이 있다. 이정도 단어들의 쓰임새만 알아도 풍부한 Bool 변수명을 짓기에 충분한 것 같다.
var supportsVideo: Bool //CXProviderConfiguration: 비디오를 지원하는가?
var includesCallsInRecents: Bool //CXProviderConfiguration
var showsBackgroundLocationIndicator: Bool //CLLocationManager
var allowsEditing: Bool //CNContactViewController: 편집을 허용하는가?
var acceptsFirstResponder: Bool //NSResponder
그 외에도 returns, preserves 등도 있었다.
var preservesSuperviewLayoutMargins: Bool //UIView
var returnsObjectsAsFaults: Bool //NSFetchRequest
하지만 3인칭 단수가 아닌 경우도 있다. 꽤나 예외적인 경우로 판단되기 때문에 이 역시 이해가 안되더라도 그냥 넘어가도 무방하다.
//Core Location의 CLRegion
var notifyOnEntry: Bool { get set }
var notifyOnExit: Bool { get set }
유저의 기기가 해당 region을 벗어나거나 진입할 때 delegate를 통해 노티피케이션을 받을지 말지를 나타내는 Bool 값이다. 이 경우 notifies가 아닌 동사원형 그대로 쓰인 이유는 region 인스턴스가 notify를 하는 주체가 아니기 때문이다. 만약 notifies로 썼다면 region 인스턴스가 노티를 준다는 뜻인데 이는 맞지 않다. (아마도 CLLocationManager가 노티를 주지 않을까. 아무튼 region 인스턴스가 notify를 하는 주체가 아니기 때문에 3인칭 단수를 쓰지 않았다.)
3인칭 단수가 중요한 이유
코드 한 줄을 하나의 문장으로 비유하면 주어 역할을 하는 인스턴스가 3인칭 단수이기 때문에 문법적으로 꼭 써야하는 이유도 있지만, 3인칭 단수로 쓰지 않을 경우 스위프트 API 디자인 가이드와의 일관성이 깨져서 코드를 읽는 사람을 혼란에 빠뜨릴 수 있다. 가이드에 따르면 mutating 함수는 동사원형으로, nonmutating 함수는 동사 뒤에 -ed나 -ing를 붙여서 쓴다.
친숙한 예시로 Array의 sort()와 sorted()를 생각하면 된다.
mutating func sort() -> Void //in-place sort
func sorted() -> [Element] //정렬된 새 배열을 리턴
가령,
let overlaps: Bool = region1.overlaps(region2) //region1과 region2가 겹치는가?
region1.overlap(region2) //region1을 region2와 겹치는 부분으로 mutate
let region3 = region1.overlapping(region2) //region1과 region2가 겹치는 부분만 새로운 region 인스턴스로 리턴
이런 식으로 각각 Bool, mutating, nonmutating 함수의 이름을 지어줘야 가독성을 해치지 않고, 영문법적으로도 올바르고, 가이드에 충실한 네이밍을 할 수 있다.
마무리
정리하자면
- is 용법
- is + 명사
- is + 현재진행(~ing)
- is + 형용사
is + 동사원형(절대 쓰면 안됨)
- 조동사 용법
- can, should, will 등
- 조동사 + 동사원형
- has 용법
- has + 명사
- has + 과거분사 (is + 과거분사와 의미 거의 동일)
- 동사원형 용법
- 3인칭 단수
끝.
Tags: naming, booleans, english, grammar