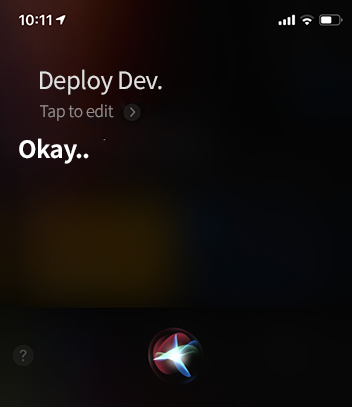
Siri, deploy an app
Why does Siri's response sound so sad...
Background
I built a Jenkins CI server for the first time early this year, and because of this I became interested in automation, so I’ve been improving my team’s deployment/development process from time to time for a year. Becoming interested is actually a poor expression, and I did not know that I hated meaningless, repetitive tasks this much. I used to think that sometimes doing repetitive tasks that I could do without thinking is good for my mental health. However, I didn’t want to do the manual tasks within the development process, so I somehow found a way to automate it and changed it after persuading my teammates. Therefore, we automated most of the repetitive, cumbersome tasks that had to go through many people, and our app is now so simple that even Siri can deploy it.
Preparations
Obviously, the app deployment stage needs to be automated. It may vary from team to team, but generally, app deployment requires version up, building, and dSYM processing(uploaded to crash collection tool) in the least, and you need to generate screenshots, and if it’s an enterprise app to be deployed within the company, the build should be uploaded to the company infrastructure.
Fastlane was a great help in deployment automation. An API with high readability can be used to easily create a build script. Since it’s an open-source platform, there are various plugins created by several people, so almost nothing is impossible. Especially, xcconfig files can be modified, git tasks can be done easily, and shell scripts also can be added as needed. Once it’s introduced, deployment will be possible with just one line of fastlane command.
And you need a build server. There are many cloud-based CI services. There are always start-ups that provide CI services running a promotion booth at developer conferences. There’s travis-ci, circleci, bitrise, etc. but this article provides information based on Jenkins, a free CI that requires you to build your own server.
Connect Siri Shortcuts
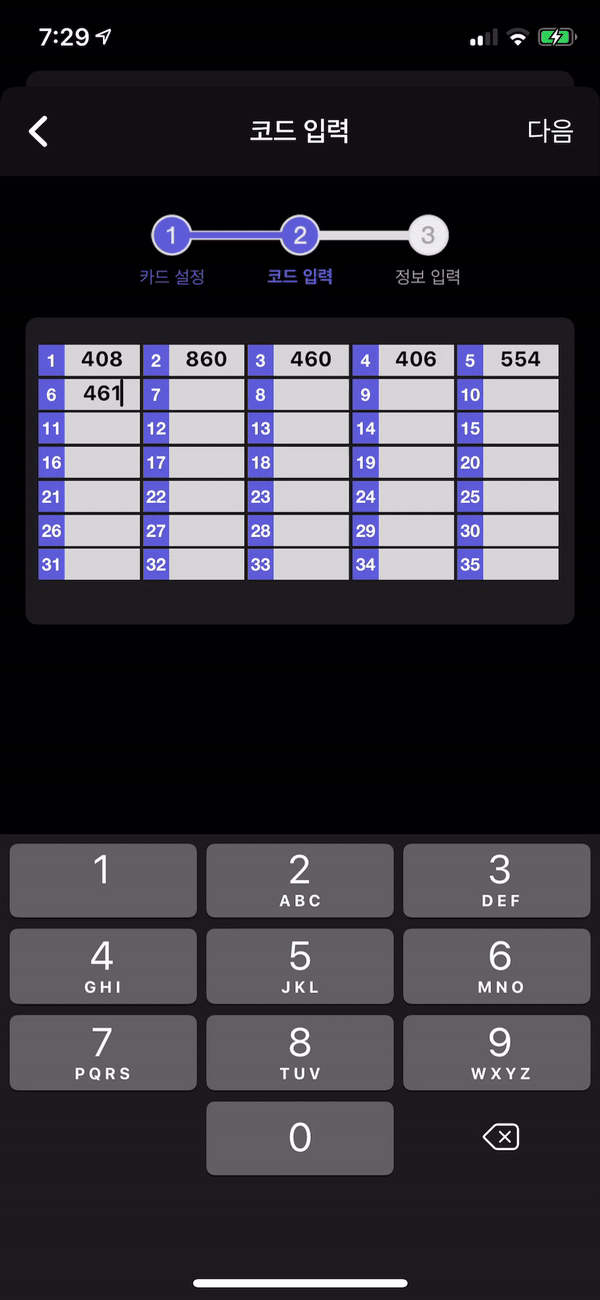
Connecting Siri Shortcuts is actually the easiest step. “Advanced preparations” that automate deployment through the CI server take 99% of the time and effort. We worked on automating processes for a whole year and connecting to Siri took only half a day. Ideally, the app will get deployed by clicking the Build Now button on the Jenkins job.
If you complete the deployment scenario, go to Jenkins job settings and check Trigger builds remotely under Build Trigger, and then assign a token value.
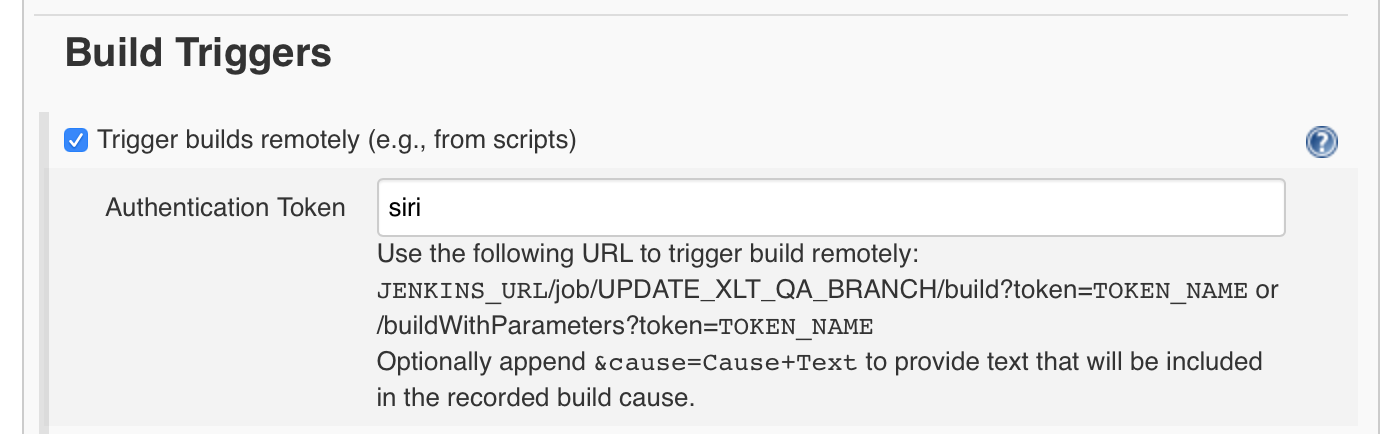
From now on, the deployment is done once the POST is sent as http://JENKINS_URL/job/JOB_NAME/build?token=TOKEN_NAME. This way, you need to process Jenkins server authentications in http communications. But if you think this is troublesome work, you can use the Build Authorization Token Root plugin to approach it only with the assigned token above.
If you’ve installed the Jenkins plugin, the deployment begins once you enter the command below into the terminal.
> curl -X POST http://JENKINS_URL/buildByToken/build?job=JOB_NAME&token=TOKEN_NAME
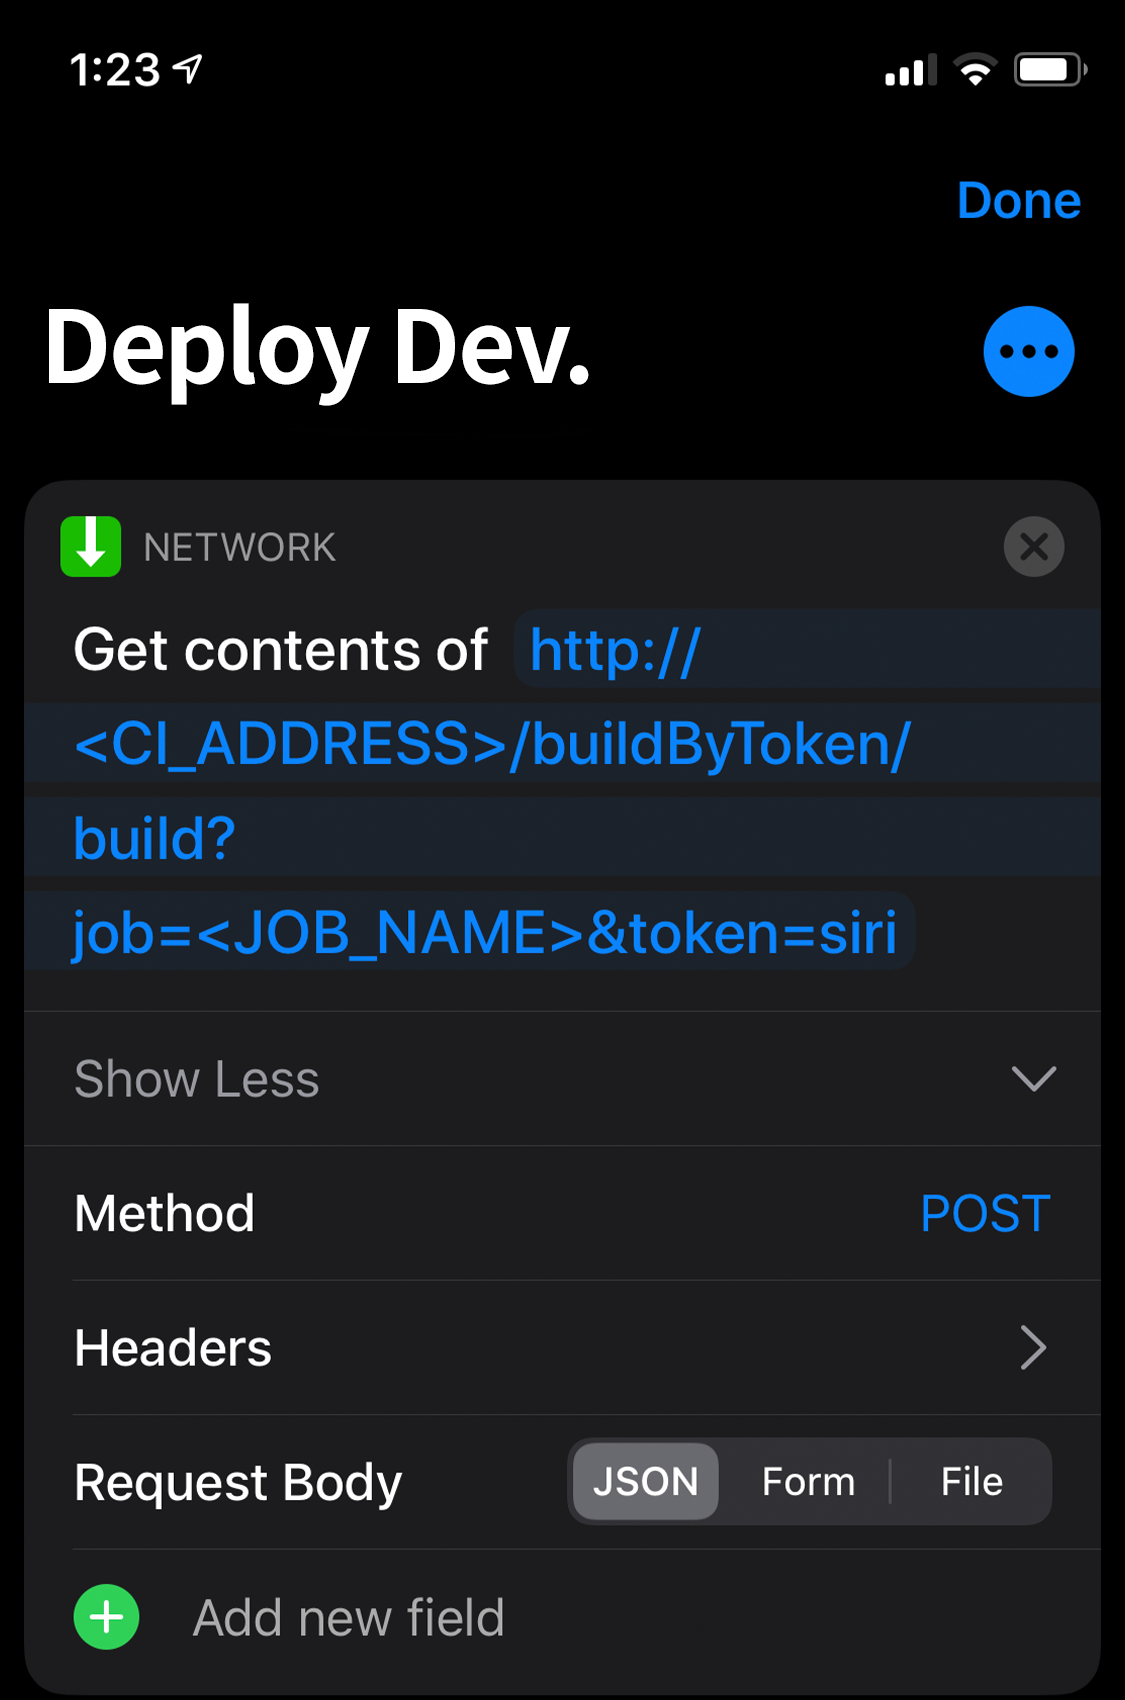
Even up to here, deployment became a much less cumbersome task. But ever since Siri Shortcuts has been released, it was my dream to make Siri do the deployment so I went a step further. Run the Siri Shortcuts app on your iPhone and create a shortcut. Put the distribution URL in Get Contents of URL, select POST, and enter the desired command, as you see below, and that’s it.
Thoughts
Connecting to Siri Shortcuts was very easy but after I’ve done it, it felt like I got paid off for continuously automating and improving the development process for a year. If the deployment process was like the state it was earlier this year, Siri deployment would have felt too far away or impossible. What presenter Sooyeol Jeon said at the first meeting of Let’s Swift at Pangyo, ‘do not think you have to write a code that’s perfectly injected with dependency from the beginning, but you can make it a little better than yesterday’ left a great impression on me. After connecting Siri, it feels like I’ve gained some experience of what Sooyeol said. I was able to come this far by changing the process so it’s easier to automate, and by automating it one by one, little by little so it’s less troublesome compared to yesterday.
It was also my first time using Siri Shortcut, and it was surprisingly well-made than I imagined it to be. There are so many things you can do with a simple interface. Even if statements, loops, variable allocations, receiving user input, putting up alerts are possible and it feels like developing an app. When I told my friend about it, he jokingly said if I should learn programming using Siri Shortcut instead of Scratch, I don’t think that’s impossible. That time, I read an article, No Code is New Programming on GeekNews, and it was about when APIs have really advanced, there will be an interface without codes at the last step, and that is the future of programming. I thought Siri Shortcuts may be included in this concept. The article started with deployment automation to praise Siri Shortcuts, but I was greatly inspired by the fact that Siri Shortcuts not only runs apps on my iPhone but also allows me to combine multiple APIs(apps) without any code.
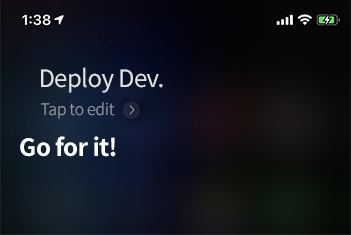
"Okay.." sounded so sad so I changed the response.
Tags: siri shortcut, deploy app, siriops
스위프트의 콤마와 &&의 차이: condition과 expression의 구분
이번 주 인터넷을 돌아다니다가 Swift의 if문에서 ‘,’와 ‘&&’의 차이라는 재밌는 글을 발견했다. 재밌었던 이유는 명료한 답변이 곧바로 떠오르지 않았기 때문이다. 가끔 이렇게 평소에는 별 생각없이 당연하게 쓰던 것에 대한 질문에 말문이 막히는 경우가 있다.
결론부터 한줄 요약 하자면, 콤마는 condition을 이어붙이는 용도로 쓰는 것이고 &&는 두개의 boolean expression을 파라미터로 받는 논리 연산자이다. 라고 결론 내릴 수 있겠다. 따라서 콤마와 &&의 차이는 condition과 expression의 차이를 이해하는데서 시작해야한다.
(1) 위에 “condition을 이어붙인다”고 했는데, 이렇게 이어붙여진 condition들을 condition-list라고 부른다. 스위프트 공식 문서에 따르면 condition-list는,
condition이거나condition , condition-list이다.
정의에 재귀가 있다는 것만 유의하면 된다. 풀어서 말하면 condition-list는 condition 하나이거나 콤마로 condition을 (정의상 무한정?) 이어붙인 것이다.
- condition
- condition, condition
- condition, condition, condition
- condition, condition, condition, condition, …
(2) 그러면 condition은 뭘까? 마찬가지로 스위프트 공식 문서에 따르면 condition은
- expression
- availability-condition
- case-condition
- optional-binding-condition
이렇게 네 개 중에 하나를 나타낸다. 아래 세 개는 이름만으로도 뭘 의미하는 꽤 명확해보인다.
(3) 그럼 condition의 한 종류인 expression은 과연 뭘까? expression도 위와 같이 계속 파고 들어갈 수 있지만 주제의 범위를 벗어나기 때문에 이쯤에서 그만하기로 하고, 최대한 간단하게 말해서 ‘연산자를 하나라도 쓴 스위프트 코드 단위’라고 볼 수 있다.
(4) 결국 &&는 하나의 expression을 만들 수 있는 수많은 연산자 중에 하나인 것이고, &&를 쓴 expression은 (condition의 정의에 따라) condition이기도 한 것이다.
그렇다면 원 질문의 예제로 돌아와서, 왜 첫번째는 되고 두번째는 안되는 것일까?
if let a = someOpt, let b = someOtherOpt { … } // works

if let a = someOpt && let b = someOtherOpt { … } // error
첫번째는 optional-binding-condition 두 개를 콤마로 붙인 condition-list 이기 때문에 잘 동작을 한다. 반면에 아래 코드는 && 논리 연산자를 썼는데, 논리 연산자는 두 개의 bool expression을 인자로 받는 연산자이다. 그런데 let a = someOpt와 let b = someOtherOpt는 bool expression이 아니다. 연산자를 잘못 썼기 때문에 당연히 에러가 난다. 비유하자면 "hello" && "world"가 안되는 것과 같은 이유이다.
또 다른 예제를 보게되면,
if 1 == 1, 2 == 2 { … } //works

if 1 == 1 && 2 == 2 { … } //works
둘다 기능적으로는 동일하게 동작하지만 컴파일러의 눈에는 조금 다르다. 첫번째는 condition(== 연산자를 쓴 expression)이 두 개이고, 두번째는 condition(&& 연산자를 쓴 expression)이 하나인 것이다.
결론으로 돌아오면, 콤마는 condition-list를 만드는 스위프트 문법의 종류이고, &&는 논리 연산자이다. 다시 말해 콤마 앞뒤에는 condition이 와야하고 && 앞뒤에는 boolean expression이 나와야 하는 것이다. 그리고 둘의 차이를 결정 짓는 핵심은 expression은 condition이지만 condition은 expression이 아니다라는 명제이다.
보너스
Q. condition과 condition-list를 굳이 구분해야하나?
A. 그렇다. 왜냐면 condition과 condition-list를 쓸 수 있는 곳이 다르다. while, if, guard 문에는 condition-list를 쓰지만 repeat-while 문에서는 condition만 쓸 수 있다. 콤마로 여러 condition을 이어붙이는 것이 허용된 곳과 아닌 곳이 있는 것이다.
Tags: swift comma, condition-list, AND operator
iOS 13 앱 업데이트 후기
Background
iOS 13에 다크 모드가 추가돼서 개인 앱 보안카드 위젯을 오랜만에 업데이트했다. 이왕 하는 김에 9000줄 정도의 옵젝씨 코드도 전부 스위프트 전환을 했고 기존에 쓰던 C++로 된 SMTP 라이브러리도 더 가벼운 스위프트 라이브러리로 바꿨다. Pod도 전부 제거하고 이제는 카르타고로 파이어베이스만 외부에서 가져와 빌드를 하고 있다. 앱 용량도 15메가에서 6메가 정도로 줄어서 기분이 좋다. 오래된 집을 깔끔하게 리모델링한 기분이다.
1️⃣ .pageSheet 모달
개발자 입장에서 가장 충격적인 변화는 modal presentation의 기본 값이 바뀌었다는 점이다. 기존에는 fullScreen이 기본이었고 화면 전체를 가렸다. iOS 13에서는 pageSheet가 기본이 되었고 이 프레젠테이션은 화면 전체를 가리지 않고 상단에 살짝 걸쳐 있다. 그리고 화면을 드래그해서 뷰를 내릴 수 있다. iOS 13이 나오기 전부터 페이스북 앱에서는 외부 링크용 웹뷰가 이런식으로 되어있었고 지도나 내비게이션 앱, AR 앱 등에서 최근 급격히 많이 보이기 시작했다. 이와 관련된 오픈소스도 굉장히 많이 등장했다.
아이폰의 크기가 많이 커진 상황에서 기존의 모달을 닫으려면 스크린 맨 위에 있는 버튼에 닿기 위해 위태롭게 그립을 바꾸거나 다른 손을 써야 했었다. 하지만 손가락을 멀리 뻗지 않고도 드래그 제스처로 뷰를 내릴 수 있다는 점에서 이런 형태의 모달이 개인적으로 매우 유용했고 앞으로 아이폰 앱에서 쓸 일이 많을 것이라고 생각했었다. 그래서 네이티브로 이런 UI를 사용할 수 있게 돼서 기쁜 한편, 이렇게 하위 호환성을 깨뜨리는 방식으로 급격히 변화를 가져 올 줄은 몰랐다. Modernizing Your UI for iOS 13에서 변경점에 대해 아래처럼 발표를 한다.
‘여러분, 새로운 모달 프레젠테이션 스타일입니다! 사용자에게 더 많은 비주얼 컨텍스트를 제공합니다. 인터랙티브하게 dismiss 할 수도 있습니다. 멋지죠? 어떻게 쓰면 되나고요? 그냥 아무것도 안하면 됩니다. 왜냐면 저희가 기본 값을 이걸로 바꿔버렸기 때문이죠. 예전처럼 동작하게 만들고 싶으시다고요? 코드를 한 줄만 추가해주면 됩니다!’
예전처럼 동작하려면 코드를 추가해야 한다니! 그리고 이걸 이렇게 기쁜 표정으로 자랑하듯이 발표하다니. 이런 태도, 뻔뻔함이 애플의 상징처럼 느껴져서 황당하면서 엄청 재밌었다. Breaking change 까지는 아니지만 이번 모달의 변화는 거의 에러 못지 않게 기존 UI와의 호환성을 깨뜨리거나 유저 플로우에 큰 영향을 준다. 특히 모달을 벗어나는 경로가 새로 생긴 것에 대한 추가 작업이 필수이다.
예전에는 모달 화면을 나갈 수 있는 유일한 방법은 앱 개발자가 추가한 코드를 통해서 밖에 없었다. 하지만 pageSheet 모달을 사용하면 드래그 제스처가 자동으로 추가된다. 여기에 개발자가 관여할 수 있는 방법은 두 가지가 있다. UIViewController의 isModalInPresentation을 true로 하면 아예 유저가 드래그로 dismiss 할 수 없게 된다. 또는 UIAdaptivePresentationControllerDelegate에 새롭게 추가된
func presentationControllerShouldDismiss(_ presentationController: UIPresentationController) -> Bool
에서 지정할 수도 있다.
마지막으로 유용한 델리게이트 하나는
func presentationControllerDidAttemptToDismiss(_ presentationController: UIPresentationController)
isModalInPresentation이 true거나 presentationControllerShouldDismiss 메서드가 false 를 리턴하면 유저의 드래그 dismiss가 실패하면서 이 메서드가 불린다. 사용자가 작업해 둔 내용물이 있을 때 실수로 날리지 않게 이때 정말 화면을 나갈 것이냐를 확인하는 얼럿이나 액션 시트를 띄워주면 된다.
2️⃣ @propertyWrapper
Swift 5.1에 추가된 프로퍼티 래퍼가 매우 유용했다. 프로퍼티 래퍼는 변수의 저장소, 캐싱 전략, 바운딩 로직 등등 변수의 특성과 관련된 로직을 분리하여 재사용할 수 있게 해주는 기능인데 총 4가지의 프로퍼티 래퍼를 만들어서 썼다.
- SharedDefaults: UserDefaults에서 값을 가져오는 래퍼.
- SharedKeychain: Keychain에서 값을 불러오는 래퍼.
- LateInitialized: 변수를 사용하기 전에 무조건 값을 세팅해줘야 하는 래퍼. IUO를 제거할 수 있다. 전부터 unspecified()로 만들어서 쓰던 것을 대체했다. 굳이 lazy 키워드를 써주지 않아도 돼서 실수 유발 가능성도 없고, 원하면 immutable 하게도 만들 수 있어서 훨씬 사용성이 좋다.
- ClampedString: 지정해둔 max 길이를 넘어갈 수 없는 String 래퍼
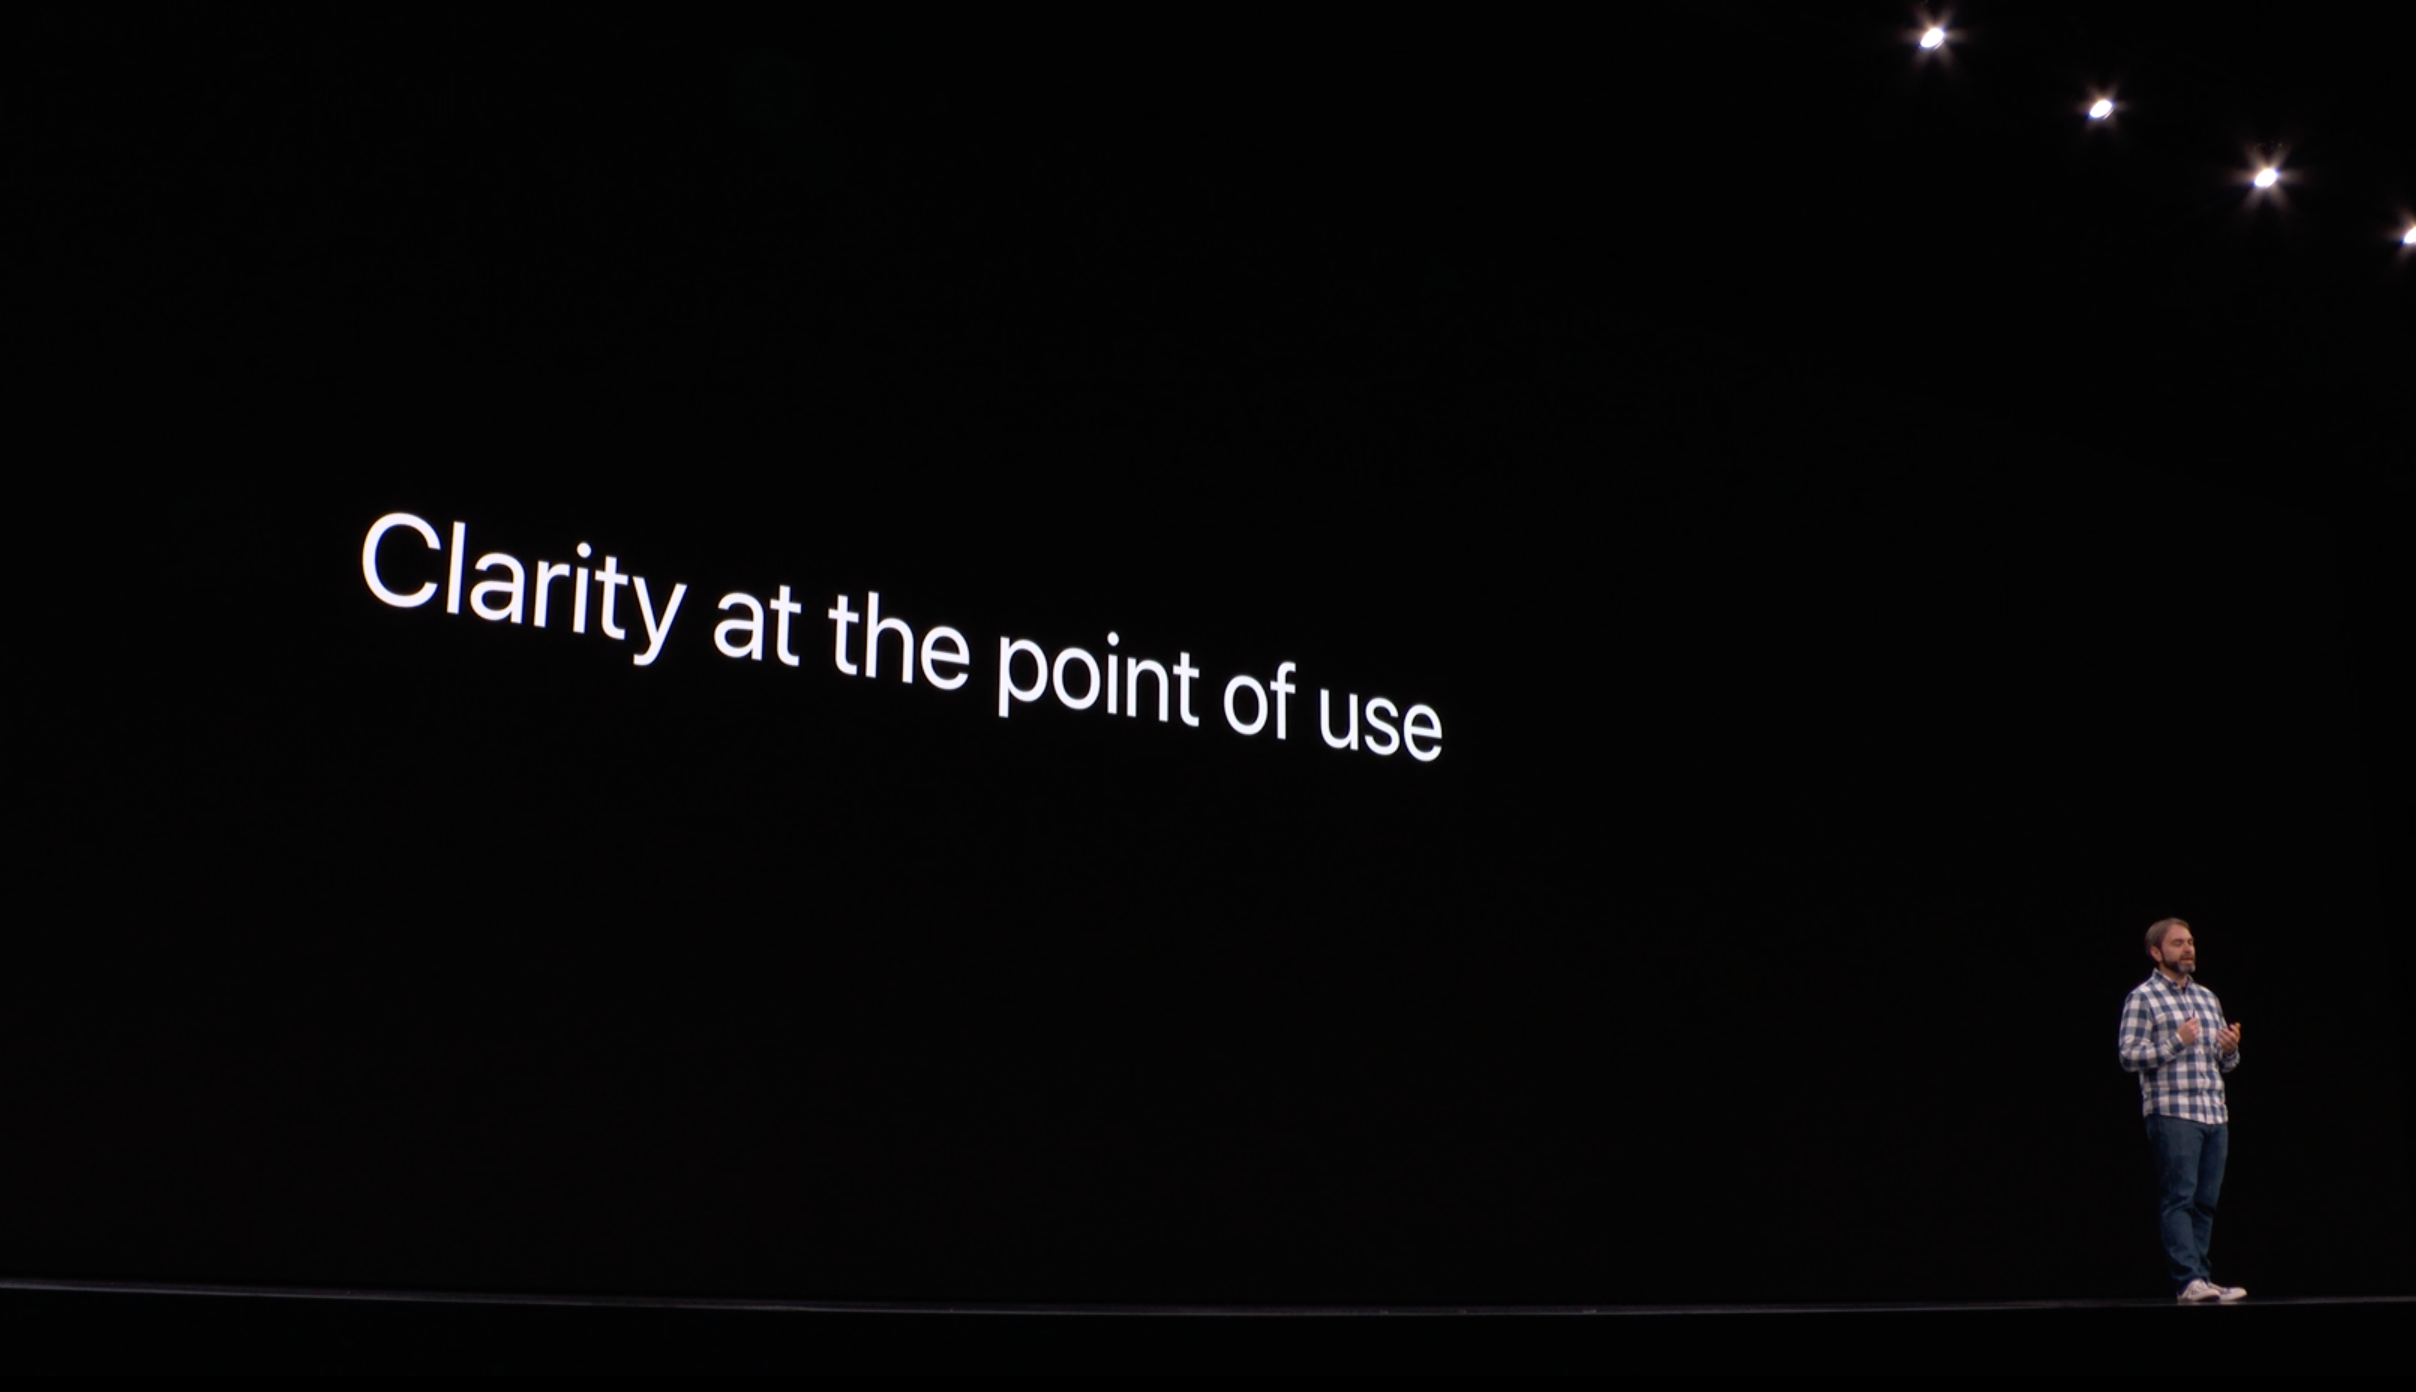
프로퍼티 래퍼는 스위프트의 API 디자인 가이드라인에서 가장 중요시 하는 원칙 Clarity at the point of use에 딱 부합하는 기능인 것 같다.
3️⃣ SF Symbols
정-말 좋다. 특히 사이드 프로젝트 앱 개발을 할 때 무료 아이콘을 쓰겠다고 이곳 저곳에서 원하는 걸 가져오다 보면 통일성도 떨어지고 무엇보다 퀄리티가 너무 아쉽다. SF Symbol은 정말 많고 다양해서 용도가 무궁무진하다. 게다가 이미 시스템 앱들이 쓰고 있다. 보안카드 위젯 앱에서도 기존에 쓰던 아이콘들을 전부 대체했고 텍스트로 쓰던 부분도 적절한 아이콘으로 교체할 수 있었다.
SF Symbol은 두 가지 방법으로 사용할 수 있다. 첫번째는 이미지로 쓰는 것이다. UIImage(systemName:) 생성자를 사용해서 이미지를 만들 수 있다. 두번째는 텍스트로 쓰는 것이다. 원리가 뭔지는 모르겠지만 심볼은 SF(샌프란시스코) 폰트에 포함되어있다. 그래서 SF 폰트로 설정된 UILabel이나 UITextView 등에서 이모티콘처럼 텍스트와 함께 사용할 수 있다. 심지어 폰트 두께와 크기에 따라서 아이콘도 바뀐다. 이미지로 쓸 때도 두께와 크기를 변경할 수 있다.
관련 링크
- SF 폰트
- SF 심볼 설명
- SF 심볼 앱 다운로드: 전체 심볼을 보거나 검색할 때 유용.
4️⃣ 다크 모드
사용자에게 이번 업데이트의 최대 하이라이트는 다크 모드겠지만 개발 관점에서 딱히 특별하거나 재밌는 것은 없었다. 속된 말로 노가다지만, 하고 나서 결과물을 보면 뿌듯하고 개운한 느낌이랄까. 어두운 배경의 새로운 색을 조합하고, xcasset에 named color를 만들어서 적용하는 것 뿐이다. 네임드 컬러는 Xcode 9부터 등장했고 iOS 11부터 지원한다. 네임드 컬러를 만들어 놓고 UIColor(named:) 로 생성하거나 스토리보드 컬러 피커에서 고를 수도 있어서 사용이 편리하다.
또한 다크 모드 대응의 일환으로 애플에서 시스템 컬러와 다이나믹 시스템 컬러라는 것을 새로 만들었다. ‘system’ 이라는 접두어가 쓰인 색을 쓰면 자동으로 다크모드와 라이트모드에서 각각 적절한 색이 사용된다. 다이나믹 시스템 컬러라는 것은 배경, 컨텐츠용 텍스트, separator 등등 색의 사용처 기준으로 색의 이름을 지은 것이다. 색 이름이 label, secondaryLabel, tertiaryLabel, separator, link 등등 처럼 되어있어서 의미에 맞춰 사용하면 된다. 또한 다크모드 대응된 회색도 6가지 종류나 생겼다. HIG 설명에 따르면 투명도가 잘 안 먹히는 상황에서 드물게 쓰라고 하는데 이건 디자인쪽 언어인거 같아서 무슨 말인지 잘 이해가 안간다.
개발하다가 공식 문서를 읽지 않아서 디버깅이 오래 걸렸던 이슈 하나는 다크모드 / 라이트모드 전환을 할때 어떤 뷰들만 색이 전환이 안되는 이슈였다. 알고보니 UIColor 객체를 바로 사용하면 자동으로 전환이 되지만 CGColor 값으로 사용하면 개발자가 수동으로 다크 모드 전환에 대응했어야 하는 것이다. (참고: Standard Colors). 그래서 커스텀 뷰의 CAShapeLayer에 적용해놓은 borderColor와 fillColor는 다크 모드 전환이 안되고 있었다. 따라서 다크모드 전환이 될 때 불리는 적절한 메서드 내에서 CGColor 값을 지정해주어야 한다.
종합적으로 느낀 점은 언제나 그랬듯 애플이 기본으로 제공해주는 것들만 적절히 잘 써도 디자이너의 도움 없이도 그럴듯하게 다크모드를 적용할 수 있다.
Tags: iOS 13, dark mode, propertyWrapper, SF symbols
구글 코드 리뷰 가이드
구글에서 공개한 개발자를 위한 코드 리뷰 가이드를 요약 번역했습니다. Review 페이지로 가서 볼 수 있습니다.
Tags: code review guide, google